














This video for Paragon kiln maintenance can be easily used as a reference guide to repairing other types of kilns that use firebrick.
Showing posts with label cement. Show all posts
Showing posts with label cement. Show all posts
Saturday, April 7, 2012


Saturday, January 28, 2012
Repairing my glass kiln
The other day I was getting ready to do some fusing in my kiln, had it all set up with firing schedule set and ready to go. I pushed the start button on my RampMaster II and my kiln barely began to start to work. I thought about something and quickly raised the lid on the kiln to check on my glass art project when suddenly the RampMaster blew up! It sounded like a gun shot, right next to me and needless to say, it scared the shit out of me! I quickly shut off the RampMaster's power and unplugged the kiln. I also noticed that smoke was coming from the RampMaster. It totally smelled like burning electronics.


I went online to the Evenheat webpage trying to find out what to do next. I use my kilns regularly at my studio and I need them in working order plus I paid quite a lot of money for this kiln and don't want to have to replace it with a new one. I was hoping that they'd say something about unplugging the RampMaster from the kiln and sending it in to their factory for repairs. But their web page said that for repairs, have a qualified electrician work on the kiln. It sounds like an easy thing to do except when you live in a very rural area. And after calling basically everyone that seemed qualified in the yellow pages in my area, I gave up.
Now I am on my own. For this reason, I thought I'd dedicate this entire post to how I am going to repair my kiln. So I began working on it yesterday, Friday. I can't tell anyone else how to repair their kiln especially since I have just barely begun fixing this one. But maybe I can help someone else out there that has issues with the electronics on their kiln and not able to use it anymore. I see some really cheap kilns listed on Craigslist occasionally and now I'm thinking they probably have an electrical issue that the owner does not know how to fix and the manufacturer won't do repairs.
To begin with, when the RampMaster blew up, I quickly unplugged the kiln from the wall and have kept it unplugged. You don't want to start a fire or get electrocuted. Then I unscrewed the four screws that hold the front cover on the RampMaster II. Once done I very carefully looked into the controller to see if I could see something that looked burned. I did see a wire that perhaps looked slightly melted (which I will look at more closely later), but more importantly I found part of the broken piece laying on the bottom of the RampMaster itself. I carefully fished that broken part out, it wasn't easy to do since there are a lot of twisted heavy wires in there, yet I was amazed to see that the part had all of the information I needed right there! What luck!

This is the broken part of my kiln, the RampMaster II, that decided to "blow up" on me!

Here's the remains of the broken piece that I fished out of the RampMaster.
I googled Potter & Brumfield and found out that this piece belongs to a relay.
On Monday I'll call Evenheat to order a new relay plus I'll need to get a schematic or some sort of procedure so that I know how to disassemble the RampMaster so that I can replace the relay. I saw that to get the relay out to replace it, I'll have to remove a lot of the electronic insides of the RampMaster! I also want to know why the relay blew up so that I can prevent that from happening again.
Stay tuned for updates!
January 30, Update

Inside the RampMaster II view 1

Inside the RampMaster II view 2

Relays in the RampMaster II.
As of today, I ordered the new part from the Evenheat company. When ordering parts for your kiln you will need to know your model number. You can find that number etched onto the side of your RampMaster. This unit (my kiln) has two relays sitting side by side on the bottom right in this picture.
February 6, Update:
Still waiting for the part to arrive from Evenheat, should be here sometime early this week!
February 11, Update:
Well I replaced the broken relay with the new part that I ordered from Evenheat. When I plugged the kiln in the LED's didn't light up so it's still not fixed.
March 23,2012 Update:
I forgot to give my final update on repairing the kiln. I replaced the relay and I couldn't get the kiln to work at all. I then went and checked my breakers and.... success!
April 1, 2012 Update: (not an April fools joke either!)
Well the kiln worked once and a relay blew up, again! So the other day I ordered two new relays plus some other parts from Evenheat. Today I decided to work on the kiln. I replaced the original relay and tested out the kiln. The element in the lid began heating up without me even starting up a program! I shut it off and tried to figure out what was wrong now. I came across this Evenheat manual for the GTS-23. And found this paragraph:
Kiln won’t stop firing (won’t shut off)
Error Codes associated with a kiln not shutting off are E– 2 or E-4 or E– d.
Most likely a failed relay (failed closed). A failed relay may cause the kiln temperature to increase when it should be decreasing. Depending upon your
particular kiln model you may see up to 3 relays used in its design. Identifying the failed relay is fairly simple as the element connected to it will remain on.
Unplug the kiln and remove the kiln control panel. Simply follow the element leads to the relay to identify it. Relays are maintenance items and we
recommend replacing all of them when needing to replace one.
Check your program. While you won’t see the error codes if you’ve programmed incorrectly this problem is possible.
After reading that, I replaced the relay that I had replaced not long ago. And this time when I plugged in the kiln and turned on the RampMaster, it powered up correctly.
I decided to thoroughly inspect the kiln at this point since there had to be a reason why the relay I just replaced in February had died so quickly. And that's when I discovered the culprit. One of the elements in the wall of the kiln is broken. Below is a pic of the bad element.


Now I'm thinking that for some reason the relay kept blowing up because of the element being broken and not making a connection. The ends of the element in the picture above have glass on them. The glass must have coated the element and eventually it broke right at that spot. There is also a dark black spot below where the element is laying, I'm not sure what that is, but when I go to replace the element I will find out!
So on Monday I'll order a new element and replace it. I will also have to gouge out the glass that melted and broke the element in the first place, since it has now melted into the firebrick. More pics to come!

April 10,2011
I ordered two side elements from the manufacturer and received them a yesterday. I started the element repair this morning. Actually, it didn't take very long either!

I unplugged the kiln first. I can't stress how important safety is, especially when working on an electric kiln! Then I removed the front panel of the RampMaster. I sat it on a little box so that it wasn't hanging by it's wires. Then, as seen in the picture above I removed the wire from the top part of the element where it protrudes from the inside of the kiln. So as not to get confused with wiring the elements (since I replaced both of them) I removed one part of an element at a time.

Above shows how I removed the element. The top two rows of element are really just the first element, it wraps around the kiln twice. I gently removed the old element by hand, didn't need any tools for this.

In the picture above you can see how the element is wrapped around inside of the kiln. The element has already been removed from the top right "ledge".

Now you can see that as I removed the old element, right behind it, I put in the new element. The new element has two long straight twisted wires that you insert through a little hole in the kiln wall. They are the wires that protrude through the kiln wall into the RampMaster controller, where they are attached to wires in the controller itself.


When putting your new element back into the ledge, try to compress the element slightly. I ended up with extra element when I finished installing it. I had to then go back and refit the element more compactly into the ledge so that I didn't have any extra hanging out. It's important to do this uniformly which isn't easy to do! Also don't forget to make sure that the element fits correctly into the ledge, especially on the corners.

Above is the second element being replaced. This is the spot where this element was broken by being melted completely through by a piece of rogue glass.

Above, after removing the broken element I had to remove the remains of the rogue glass (that blackish looking area) that has also melted deeply into the firebrick. If the glass is not removed and a new element added, that glass will melt back onto the new element and eventually ruin it. Plus that glass will melt deeper into the firebrick as well. Unfortunately to remove that glass I had to remove the front of the lip of the ledge because I couldn't get to it. I did that with an Exacto knife.

Above shows pieces of contaminated firebrick that I dug out of the area with a flat head screwdriver.

The picture above shows my patch job after I removed all of the melted glass. It isn't pretty! I could have put a piece of new firebrick in the spot and cemented that, and it would have looked much better. Unfortunately I didn't buy any replacement firebrick and I didn't want to wait another week, again, to order more. Instead I used my kiln cement and "glued" back the good pieces of firebrick. I let all of the cement dry, including a few cracks and broken pieces that I repaired, then continued with the element repair.


The picture above just shows more of the element installation process. You can see the twisted wire before I cut it and attached the RampMaster's wires back together.
Once done I put everything back together again. During the entire repair process I made sure to vacuum the inside of the kiln frequently. The element instructions said to heat the kiln for three minutes to burn a coating off of the brand new elements. Once done, I was ready to fire!
Because of all of the repair work that I have recently done, I decided to start my kiln early in the morning and monitor it often during the entire firing process.
I forgot to give my final update on repairing the kiln. I replaced the relay and I couldn't get the kiln to work at all. I then went and checked my breakers and.... success!
April 1, 2012 Update: (not an April fools joke either!)
Well the kiln worked once and a relay blew up, again! So the other day I ordered two new relays plus some other parts from Evenheat. Today I decided to work on the kiln. I replaced the original relay and tested out the kiln. The element in the lid began heating up without me even starting up a program! I shut it off and tried to figure out what was wrong now. I came across this Evenheat manual for the GTS-23. And found this paragraph:
Kiln won’t stop firing (won’t shut off)
Error Codes associated with a kiln not shutting off are E– 2 or E-4 or E– d.
Most likely a failed relay (failed closed). A failed relay may cause the kiln temperature to increase when it should be decreasing. Depending upon your
particular kiln model you may see up to 3 relays used in its design. Identifying the failed relay is fairly simple as the element connected to it will remain on.
Unplug the kiln and remove the kiln control panel. Simply follow the element leads to the relay to identify it. Relays are maintenance items and we
recommend replacing all of them when needing to replace one.
Check your program. While you won’t see the error codes if you’ve programmed incorrectly this problem is possible.
After reading that, I replaced the relay that I had replaced not long ago. And this time when I plugged in the kiln and turned on the RampMaster, it powered up correctly.
I decided to thoroughly inspect the kiln at this point since there had to be a reason why the relay I just replaced in February had died so quickly. And that's when I discovered the culprit. One of the elements in the wall of the kiln is broken. Below is a pic of the bad element.


So on Monday I'll order a new element and replace it. I will also have to gouge out the glass that melted and broke the element in the first place, since it has now melted into the firebrick. More pics to come!

April 10,2011
I ordered two side elements from the manufacturer and received them a yesterday. I started the element repair this morning. Actually, it didn't take very long either!

I unplugged the kiln first. I can't stress how important safety is, especially when working on an electric kiln! Then I removed the front panel of the RampMaster. I sat it on a little box so that it wasn't hanging by it's wires. Then, as seen in the picture above I removed the wire from the top part of the element where it protrudes from the inside of the kiln. So as not to get confused with wiring the elements (since I replaced both of them) I removed one part of an element at a time.

Above shows how I removed the element. The top two rows of element are really just the first element, it wraps around the kiln twice. I gently removed the old element by hand, didn't need any tools for this.

In the picture above you can see how the element is wrapped around inside of the kiln. The element has already been removed from the top right "ledge".

Now you can see that as I removed the old element, right behind it, I put in the new element. The new element has two long straight twisted wires that you insert through a little hole in the kiln wall. They are the wires that protrude through the kiln wall into the RampMaster controller, where they are attached to wires in the controller itself.


When putting your new element back into the ledge, try to compress the element slightly. I ended up with extra element when I finished installing it. I had to then go back and refit the element more compactly into the ledge so that I didn't have any extra hanging out. It's important to do this uniformly which isn't easy to do! Also don't forget to make sure that the element fits correctly into the ledge, especially on the corners.

Above is the second element being replaced. This is the spot where this element was broken by being melted completely through by a piece of rogue glass.

Above, after removing the broken element I had to remove the remains of the rogue glass (that blackish looking area) that has also melted deeply into the firebrick. If the glass is not removed and a new element added, that glass will melt back onto the new element and eventually ruin it. Plus that glass will melt deeper into the firebrick as well. Unfortunately to remove that glass I had to remove the front of the lip of the ledge because I couldn't get to it. I did that with an Exacto knife.

Above shows pieces of contaminated firebrick that I dug out of the area with a flat head screwdriver.

The picture above shows my patch job after I removed all of the melted glass. It isn't pretty! I could have put a piece of new firebrick in the spot and cemented that, and it would have looked much better. Unfortunately I didn't buy any replacement firebrick and I didn't want to wait another week, again, to order more. Instead I used my kiln cement and "glued" back the good pieces of firebrick. I let all of the cement dry, including a few cracks and broken pieces that I repaired, then continued with the element repair.

The picture above shows the twisted wires from the new second element protruding through the kiln wall into the RampMaster. The two thick brown wires that are connected to round pieces of spacers which are seen in the upper area of this picture (the spacers are made of the same clay material that kiln posts are shelves are made of) are the ends of the first new element that I replaced. There are screws that hold on a brass fitting which in turn hold the twisted wires from the element together with the thick wires from the RampMaster. The long twisted wires were cut by me, to fit exactly into the length of the brass fitting.

Once done I put everything back together again. During the entire repair process I made sure to vacuum the inside of the kiln frequently. The element instructions said to heat the kiln for three minutes to burn a coating off of the brand new elements. Once done, I was ready to fire!
Because of all of the repair work that I have recently done, I decided to start my kiln early in the morning and monitor it often during the entire firing process.
Tuesday, January 10, 2012
Time Lapse video of building a leaded glass window.
We watched this YouTube video showing a time lapsed video of making a leaded stained glass window at the Beyer Studio in Philadelphia, work done by Chris Thompson. It really gives people an idea of how much work it takes to finish a leaded glass window! The finished window is absolutely beautiful!
Friday, October 14, 2011
Kiln problem, messed up thermocouple
Today I had our Evenheat kiln all set up to start fusing a piece that we're working on, but when I went to turn on the kiln and start up the program, the Rampmaster II controller said FAIL! I also noticed that the kiln was displaying the temperature inside of it at times as high as 2000-3000 degrees. Since the kiln was completely cool at that time and the location where it's at is only about 70 degrees, something major was wrong.

Like always I went searching online for an answer to this issue. We are in the process of moving our store, Harrach Stained Glass out of state so I have packed away the kiln manuals and paperwork. For some reason there isn't a lot of info on this issue online. The Evenheat webpage doesn't give me a whole lot of information either. Luckily it did have an error code section so I found that FAIL, is the code for a thermocouple issue. I also thought I'd check to see if I blew the fuse on the side of the controller but I still can't figure out how to remove the darn thing! The cap on the fuse seems to be frozen.
Anyway, the best I could come up with was that the thermocouple is the culprit. Last week I removed my kiln shelf when working on a tall fused piece, so perhaps I bumped the thermocouple while removing the shelf. The thermocouple is that little part, inside the kiln, that sticks out into the interior side of the kiln by the rampmaster. I did discover that there is a thermocouple cement that I can buy from Evenheat! And I'm going to look for it and buy it asap.
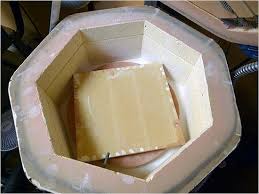

Yea, the kiln is actually back up and running. I wiggled the thermocouple and tried to lightly push it back into the kiln wall and suddenly I noticed that the temperature reading was once again reading the correct room temperature. Basically, now I've been keeping a close eye on it this morning to make sure it doesn't go haywire and perhaps overheat.


our Evenheat kiln setup
Like always I went searching online for an answer to this issue. We are in the process of moving our store, Harrach Stained Glass out of state so I have packed away the kiln manuals and paperwork. For some reason there isn't a lot of info on this issue online. The Evenheat webpage doesn't give me a whole lot of information either. Luckily it did have an error code section so I found that FAIL, is the code for a thermocouple issue. I also thought I'd check to see if I blew the fuse on the side of the controller but I still can't figure out how to remove the darn thing! The cap on the fuse seems to be frozen.
Anyway, the best I could come up with was that the thermocouple is the culprit. Last week I removed my kiln shelf when working on a tall fused piece, so perhaps I bumped the thermocouple while removing the shelf. The thermocouple is that little part, inside the kiln, that sticks out into the interior side of the kiln by the rampmaster. I did discover that there is a thermocouple cement that I can buy from Evenheat! And I'm going to look for it and buy it asap.
thermocouple seen on lower section of kiln in picture above

thermocouple seen sticking into kiln on the right side in picture above

kiln in process of heating, thermocouple seen on right
Our studio has had this Evenheat Kiln for more than ten years and this is the first time we've ever had any problems with it. If anyone is ever wondering what kind of kiln to purchase, we highly recommend Evenheat Kilns! We don't know what we'd do without this workhorse kiln! We love it.
Below we posted the link to the RampMaster II manual.
Evenheat Kiln Inc. RampMaster II Glass Manual
Tuesday, September 6, 2011
How to repair a broken piece in a leaded glass window.
Occasionally a glass artist will be asked if they can repair a broken leaded glass window but are not sure how to go about repairing the piece. I think that repairing a leaded glass window is much easier than repairing a copper foiled window.
To begin with you should tape together what is left of the broken piece of glass. If necessary make a rubbing of the window. Tape a piece of white paper on one side of the window, lightly rub the window with a crayon or charcoal so that you can see the shadow of the lead came lines.
Next, remove the frame. If you have a zinc came frame, you need to use a temperature controlled iron so that you can turn down the heat. Then with the temp turned down, heat up and actually carefully move the solder from the soldered areas on the zinc came frame, use paste flux on the joint so that the solder will flow. This will allow you to "break" or open up the soldered joints. You'll have to do this on the corners of the zinc frame and the areas where the lead came is soldered to the zinc frame as well, remember to do both sides of your window. Carefully remove the zinc frame from the closest side to the broken piece of glass, you might have to remove two sides of zinc came.
Once removed, use your lead knife and cut into the closest soldered joints so that you will be able to open up the window to remove the broken piece of glass. You will have to cut both sides of the window, in the same spots. You might only have to cut up one area, but if the piece is large and you can't get into the broken piece, you will probably have to cut up into the window in two areas.


When you have cut both sides of lead came (only on the solder joints), front and back, up to the broken piece of glass, carefully remove or open up the window to where the broken piece is located. Once there carefully remove the broken piece of glass with needle nose pliers. Since the piece is cemented in place, it might take some work to pull the piece out. Use your lead knife to clean out the lead came surrounding the once broken piece of glass. If the lead came is damaged, you will then need to replace it.
Use the old piece of glass as a template to make a new paper pattern to replace the glass. Place the broken piece of glass on a piece of paper, trace around it with a pencil, and cut it out with regular scissors. Glue that piece of paper to the new replacement glass, cut, grind and its ready to replace.
If the piece of glass is too broken, or non existent, to use as a template to make the new piece of glass, use the rubbing you made of the original window to make the new paper pattern piece. We like to make a copy of that template first before doing anything else, just in case. Take one copy of the etching and with regular scissors, cut out the piece or pieces that needs to be replaced. When cutting, cut close to the center of the lead line that was traced in the original rubbing.
Once new pieces are cut and installed, re solder the once cut lead came joints. By doing it this way, it is impossible to tell that the window has been repaired! Then if the piece has a zinc frame, solder it back on before cementing.
Cement, clean and polish the window and it is now repaired!
To begin with you should tape together what is left of the broken piece of glass. If necessary make a rubbing of the window. Tape a piece of white paper on one side of the window, lightly rub the window with a crayon or charcoal so that you can see the shadow of the lead came lines.
Next, remove the frame. If you have a zinc came frame, you need to use a temperature controlled iron so that you can turn down the heat. Then with the temp turned down, heat up and actually carefully move the solder from the soldered areas on the zinc came frame, use paste flux on the joint so that the solder will flow. This will allow you to "break" or open up the soldered joints. You'll have to do this on the corners of the zinc frame and the areas where the lead came is soldered to the zinc frame as well, remember to do both sides of your window. Carefully remove the zinc frame from the closest side to the broken piece of glass, you might have to remove two sides of zinc came.
Once removed, use your lead knife and cut into the closest soldered joints so that you will be able to open up the window to remove the broken piece of glass. You will have to cut both sides of the window, in the same spots. You might only have to cut up one area, but if the piece is large and you can't get into the broken piece, you will probably have to cut up into the window in two areas.
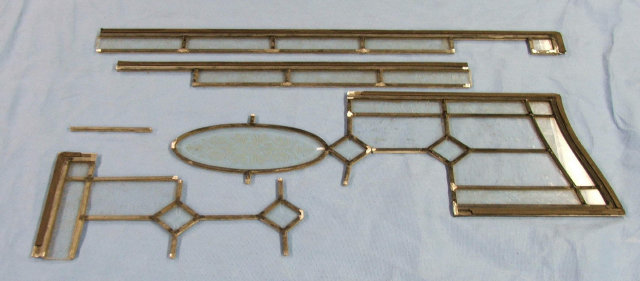


When you have cut both sides of lead came (only on the solder joints), front and back, up to the broken piece of glass, carefully remove or open up the window to where the broken piece is located. Once there carefully remove the broken piece of glass with needle nose pliers. Since the piece is cemented in place, it might take some work to pull the piece out. Use your lead knife to clean out the lead came surrounding the once broken piece of glass. If the lead came is damaged, you will then need to replace it.
Use the old piece of glass as a template to make a new paper pattern to replace the glass. Place the broken piece of glass on a piece of paper, trace around it with a pencil, and cut it out with regular scissors. Glue that piece of paper to the new replacement glass, cut, grind and its ready to replace.
If the piece of glass is too broken, or non existent, to use as a template to make the new piece of glass, use the rubbing you made of the original window to make the new paper pattern piece. We like to make a copy of that template first before doing anything else, just in case. Take one copy of the etching and with regular scissors, cut out the piece or pieces that needs to be replaced. When cutting, cut close to the center of the lead line that was traced in the original rubbing.
Once new pieces are cut and installed, re solder the once cut lead came joints. By doing it this way, it is impossible to tell that the window has been repaired! Then if the piece has a zinc frame, solder it back on before cementing.
Cement, clean and polish the window and it is now repaired!
Wednesday, August 3, 2011
Stained glass stepping stone tutorial

Garden art gives your garden or landscape a personality and stained glass stepping stones provide that personality a unique look all its own. This afternoon craft project is easy to create and will last for years of enjoyment. Let's get started on a stained glass stepping stone.
Instructions
- 1Draw A Stained Glass PatternDraw your stained glass pattern and size it to fit into the stained glass stepping stone mold you are using. This wolf head will be used in a 14" round mold. Print out two copies of the stained glass pattern. One print out normal and one printed as a reversed image. If you can not print a reversed image then print out two normal patterns. Turn one pattern over and trace the pattern on the back. This will be used to assemble your stained glass pieces in Step #3.
- 2
Stained glass stepping stone glass pieces.
Stained Glass Stepping Stone Pattern PiecesNumber and color code each piece of your pattern and cut the pattern pieces out. Use these stained glass pattern pieces to cut your stained glass pieces. Number the pieces and grind as needed. - 3
Stained glass pieces for stepping stone.
Assembling Your Stained Glass Stepping Stone PiecesTake the reversed copy of your stepping stone pattern and tape it down to your work table. Cut a piece of clear contact paper the exact size of the stepping stone mold. Place the contact paper over your reversed pattern, stick side up, and use masking tape to tape it down. Match each stained glass piece with the corresponding number on the pattern and place it, upside down to fit the reversed pattern, on to the contact paper. This process will assemble your stained glass stepping stone pattern reversed and ready to transfer to the mold. - 4
Stained glass stepping mold with cement mixture.
Stained Glass Stepping Stone Mold ProcessTake petroleum jelly and put a light coating on the side of your mold. This will ensure the stepping stone will easily come when ready. Un tape the contact paper with the stained glass pieces on it and carefully transfer it to the mold. Press each piece of your stained glass down to ensure it is stuck tightly to the contact paper. Mix the Dura-Crete craft cement according to the directions on the box and pour the cement into the mold. Tap on the side of the mold for a minute or two to get all the bubbles to the top. Let sit for 20-30 minutes. As soon as the cement is hard to the touch carefully turn the mold over and let the stepping stone come out of the mold. - 5
Stained glass stepping stone clean up.
Clean Up Your New Stained Glass Stepping StoneCarefully remove the contact paper from the stepping stone and use a clothes pin, cut in half, to clean the cement off your stained glass pieces. This should be done quickly since the cement will dry fast when exposed to air. Let your new stained glass stepping stone sit for 15 - 20 days to ensure it cures thoroughly.
- 1
This great tutorial was created by braniac, who is an eHow User.
Monday, July 11, 2011
How to repair a leaded glass window

By Lynn Elliott
After an in-depth repair project, the leaded glass door fronting the author's built-in 1906 china cabinet looks good as new.
Looking at the missing panes and broken cames of the leaded glass doors fronting our 1906 built-in china cabinet, my husband, Todd, and I wondered how hard it would be to fix them ourselves. "Can novices repair leaded glass windows?" we asked each other. Like most old-house owners, we like the challenge of repairing our home's broken pieces—and our brick row house in Brooklyn, New York, has had plenty of parts in need of fixing. So I decided to look into the logistics of leaded glass.
After much research and some project trial and error, I found that repairing leaded glass is possible, but it's not easy. It's a daunting task that requires a high level of skill. You need to be comfortable working with both glass and some toxic materials—it's more than just the lead that's harmful—and it also helps if you have some soldering experience. In other words, repairing leaded glass is not for the faint of heart—but it can be done.
Step 1: Assess the Damage
Take stock of what you have to work with. Simpler patterns are easier to repair, while more complex designs—windows with a curved pattern, for example—require more dexterity. The leaded glass door on our cabinet had myriad problems: cracked glass, missing panes, broken lead came, and broken, bowing solder joints that were causing the remaining intact glass to loosen. We knew the damaged glass and came had to be completely replaced, but we tried to save as much of the old came (which has a lifespan of about 100 years) as we could.
Take stock of what you have to work with. Simpler patterns are easier to repair, while more complex designs—windows with a curved pattern, for example—require more dexterity. The leaded glass door on our cabinet had myriad problems: cracked glass, missing panes, broken lead came, and broken, bowing solder joints that were causing the remaining intact glass to loosen. We knew the damaged glass and came had to be completely replaced, but we tried to save as much of the old came (which has a lifespan of about 100 years) as we could.

Step 2: Prepare the Work Area and Materials
For the work surface, we laid a piece of 3/4 " plywood on a worktable and attached two furring strips (1 1./4 " x 2") at a 45-degree angle to help hold the window in place while we worked. Check that everything is squared before attaching the strips with screws. For glass-cutting, we kept a 2' section of low-pile carpet handy to work on to help prevent cracking the glass.
For the work surface, we laid a piece of 3/4 " plywood on a worktable and attached two furring strips (1 1./4 " x 2") at a 45-degree angle to help hold the window in place while we worked. Check that everything is squared before attaching the strips with screws. For glass-cutting, we kept a 2' section of low-pile carpet handy to work on to help prevent cracking the glass.

Next, you need to stretch the lead came to make it rigid enough for use. Put one end of the lead came into a vise attached to the worktable and grab the other with pliers or lead stretchers. (Tip: Cut the 6' lead strip in half so it's a manageable size.) Keep the came straight, and pull the lead so that it stretches about 1" to 1 1/2 ". Because lead came is soft and bends easily, support it with two hands when moving it. If the nubs are closed up, use a putty knife or a fid to open them. (Alternatively, you can buy stretched lead from a local supplier, as we did.)

Step 3: Liberate the Glass
Glass needs to be worked on a flat surface, so we removed the door from the china cabinet and took the window out of its frame. Working from the back side of the door, we gently pried the trim from the window with putty knives. Slip the putty knife between the trim and the frame, and use a gentle rocking motion to pry the trim loose. Next, pull out any remaining finish nails.
Glass needs to be worked on a flat surface, so we removed the door from the china cabinet and took the window out of its frame. Working from the back side of the door, we gently pried the trim from the window with putty knives. Slip the putty knife between the trim and the frame, and use a gentle rocking motion to pry the trim loose. Next, pull out any remaining finish nails.
We used the putty knives to loosen the window from the frame, then slid it out onto the work surface, laying it front side down. When working on a leaded glass repair, it's best to work on the front first because lead can slip through the joints when soldering, leaving unattractive solder joints on the back of the piece. But our piece was so fragile that we decided to work on the back first and clean up any unsightly joints on the front after the window was stable enough to turn.
Step 4: Make a Template
If you have a missing pane of glass, a template can help create a replacement piece, or it can be laid underneath the window on the worktable as a guide. To make the template, take a piece of paper large enough to cover your window and secure it atop the window with tape. Using a pencil, make a rubbing of the window's design. Be sure to capture all the details before removing the template from the window. You can trace over the lines with a marker to make them clearer. For intricate windows, number and mark each piece on the template to keep track of its correct location. Measure the length and the width of the window and record them on the template.
If you have a missing pane of glass, a template can help create a replacement piece, or it can be laid underneath the window on the worktable as a guide. To make the template, take a piece of paper large enough to cover your window and secure it atop the window with tape. Using a pencil, make a rubbing of the window's design. Be sure to capture all the details before removing the template from the window. You can trace over the lines with a marker to make them clearer. For intricate windows, number and mark each piece on the template to keep track of its correct location. Measure the length and the width of the window and record them on the template.

Step 5: Begin Repairs
Wearing safety glasses, we used a rotary tool with a 1" circular blade attachment to cut the lead joints along the left edge to access damaged areas. Cut only halfway through the joints, and be careful not to cut adjacent glass. After completing one side, flip the window to do the other side. Because our window was so brittle, we slid it slightly off the edge of the worktable, keeping the glass supported while hanging just the edge over the side, and made the cuts from underneath. (If you try this method, make sure you have a helper.) Another option is to cut a piece of plywood to fit over the window and plywood base, creating a "sandwich" that can be turned over.
Wearing safety glasses, we used a rotary tool with a 1" circular blade attachment to cut the lead joints along the left edge to access damaged areas. Cut only halfway through the joints, and be careful not to cut adjacent glass. After completing one side, flip the window to do the other side. Because our window was so brittle, we slid it slightly off the edge of the worktable, keeping the glass supported while hanging just the edge over the side, and made the cuts from underneath. (If you try this method, make sure you have a helper.) Another option is to cut a piece of plywood to fit over the window and plywood base, creating a "sandwich" that can be turned over.

We began assembling the bowed areas—where joints were cracking and the glass was loosening from the cames—trying to save the old leadwork where we could. We cleaned out the cames with putty knives and box cutters, then tried fitting the loose glass back in the cames. Next we gently tapped the old lead came and glass back into place using the hammer and the wood handle of the putty knife or a small piece of scrap lead (hitting directly with a hammer can cause the glass to crack) and secured it with German glazing nails. The glazing nails should be lightly tapped into place so you can still move them easily.
Step 6: Cut the Glass
When cutting replacement panes, we were lucky enough to have an intact original pane to use as a template. (If you don't have an intact piece, you can use the paper template as a guide.) Using a black marker, outline the template on the glass, then remove it. Next, score the glass with the glass cutter. Make sure to score inside the black lines; otherwise your replacement will be too big.
Hold the glass cutter between your middle and index finger, fitting it snugly against the joint between the two, and grasp the bottom with your index finger and thumb. Keep glass-cutter oil ready in a shallow bowl, and dip the cutter each time you score the glass. For straight scoring, butt the glass cutter against a ruler. Keep the cutter upright, and press firmly but not too hard, moving in a steady motion down the entire sheet. Practice on scrap glass first to perfect your technique.
When cutting replacement panes, we were lucky enough to have an intact original pane to use as a template. (If you don't have an intact piece, you can use the paper template as a guide.) Using a black marker, outline the template on the glass, then remove it. Next, score the glass with the glass cutter. Make sure to score inside the black lines; otherwise your replacement will be too big.
Hold the glass cutter between your middle and index finger, fitting it snugly against the joint between the two, and grasp the bottom with your index finger and thumb. Keep glass-cutter oil ready in a shallow bowl, and dip the cutter each time you score the glass. For straight scoring, butt the glass cutter against a ruler. Keep the cutter upright, and press firmly but not too hard, moving in a steady motion down the entire sheet. Practice on scrap glass first to perfect your technique.

There are two ways to break scored glass. The first is to use breaker pliers, which I found easier as a beginner. Line the white line on the pliers up on your scored line and press down to snap the glass in a straight line. You also can slide the scored portion off the worktable's edge and use the rounded head of the glass cutter to tap along the scored line, then grasp the edge with your free hand and press down until the glass snaps in a straight line. Once you've created replacement panes, check the fit in the window by either comparing the panes against the template or against the remaining lead cames.

Step 7: Cut and Solder the Lead
Next, cut the lead came to fit. As beginners, lead nippers were our tool of choice (professionals use a lead knife). The flat side of the nippers makes a straight cut; the concave side a mitered one. Place a length of came where you need a new section. With the nippers, nick the spot where you want to make a cut—it should be slightly beyond the end of the glass to leave room for soldering—then tap the lead into place with glazing nails.
Next, cut the lead came to fit. As beginners, lead nippers were our tool of choice (professionals use a lead knife). The flat side of the nippers makes a straight cut; the concave side a mitered one. Place a length of came where you need a new section. With the nippers, nick the spot where you want to make a cut—it should be slightly beyond the end of the glass to leave room for soldering—then tap the lead into place with glazing nails.

To effectively solder old lead joints, you must expose fresh lead, either by scraping the joints with a box cutter or by using the rotary tool with a wire brush, which tends to go much faster. Whatever the method, always wear a face mask for this work, as it creates a lot of dust and scraps. Clean up afterward with a shop vacuum.

Next, brush flux on all joints to be soldered (flux helps solder flow freely and adhere) and on the tip of the hot soldering iron, then clean the tip on a wet sponge (you should see water when you press on it). Glass cutter cleaners—sponges in a hard plastic case—aren't very expensive, but you also can substitute an ordinary sponge in an appropriate container.
Place the solder near the joint and melt it with the iron. Don't use too much solder, and don't extend it past the joint. In a circular motion, move the iron across the joint, smoothing the solder into and across the joint. Don't leave the iron on the joint for more than two or three seconds, or you risk melting the came. You may get solder drips on the glass, but they should easily slide or scrape off or with light scraping.

Check the joint—if you're unhappy with the soldering, let it cool and then work on it again, bearing in mind that the came can melt. When you're done, wipe down the window with paper towels and glass cleaner, then turn the window over and repeat the soldering process.

Step 8: Cement the Window
The last step is cementing the panes in place with putty and whiting. Glazing putty has a shelf life—it should be moist with some oil showing on top. If your putty gets too hard, add a touch of linseed oil to soften it up, but don't overdo it—putty should be firm, not runny.
The last step is cementing the panes in place with putty and whiting. Glazing putty has a shelf life—it should be moist with some oil showing on top. If your putty gets too hard, add a touch of linseed oil to soften it up, but don't overdo it—putty should be firm, not runny.
Wearing latex gloves, take a ball-size portion of the putty and knead it for a minute or two. The putty will soften as you work it—some lumps are normal, but most smooth out. You can add a light sprinkling of whiting to the putty for strengthening, but we preferred the putty alone because too much whiting can dry out the putty.
Secure the panel with glazing nails, then take some putty and press it into the cames to fill spaces between the glass and the lead came. Don't put too much pressure on the window—you don't want to crack the glass. Some putty may leak through to the other side. Once you've completed the panel, clean around the seams with an awl or a fid, and remove excess putty with a little roll of the putty itself or a natural-bristle brush.
Secure the panel with glazing nails, then take some putty and press it into the cames to fill spaces between the glass and the lead came. Don't put too much pressure on the window—you don't want to crack the glass. Some putty may leak through to the other side. Once you've completed the panel, clean around the seams with an awl or a fid, and remove excess putty with a little roll of the putty itself or a natural-bristle brush.

Whether or not you used whiting during kneading, you'll need to sprinkle some over the window at this point. Wear a face mask and sprinkle the whiting gently; try not to create a cloud of whiting dust. Next, gently spread the whiting around by moving a natural-bristle brush in a circular motion along the cames. The linseed oil should start drying up, and the lead will start to oxidize (turn darker), which is your cue to vacuum up the whiting. If there is residual oil, repeat the process with a second coating of whiting.

Take your natural-bristle brush and sweep the lead to create a dark patina. Doing this by hand can be tedious and labor-intensive, but we liked the results. A faster method mounts a bristle brush attachment on a drill. It's a good idea to break the brush in on the edge of the worktable first so bristles polish the lead instead of scratching it.
With the patina ready, we returned the window back its door frame and reattached the trim, giving our 1906 china cabinet a new lease on life.
With the patina ready, we returned the window back its door frame and reattached the trim, giving our 1906 china cabinet a new lease on life.

Former OHJ staffer Lynn Elliott is a copy editor for Random House Children's Books and has written numerous articles on repairing and decorating old houses.
Thursday, June 30, 2011
Videos showing a larger stained glass studio in operation!
We found this set of videos yesterday from a stained glass business, Stained Glass Resources Inc, doing restoration on a broken leaded glass window. It gives you an excellent idea of what a large stained glass studio, with multiple work areas in use, actually looks like!
This is a multi part series on the restoration and repair of a Tiffany stained glass window in the Historic Calvary United Methodist Church, in Pittsburgh, Pennsylvania. This restoration work was done by the skilled artisans at Stained Glass Resources Inc. They have received awards for the work that was done to restore the Tiffany stained glass window at Calvary United Methodist Church.
Be sure to check out all of their videos, they are extremely interesting and informative!
Click here to see http://www.youtube.com/watch?v=96I8BWtoBAk
This is a multi part series on the restoration and repair of a Tiffany stained glass window in the Historic Calvary United Methodist Church, in Pittsburgh, Pennsylvania. This restoration work was done by the skilled artisans at Stained Glass Resources Inc. They have received awards for the work that was done to restore the Tiffany stained glass window at Calvary United Methodist Church.
Be sure to check out all of their videos, they are extremely interesting and informative!
Click here to see http://www.youtube.com/watch?v=96I8BWtoBAk
Subscribe to:
Posts (Atom)
Subscribe To The Blog


 Posts
All Comments
Posts
All Comments





