• Art Glass Resources, and some business information
  • Helpful hints and tips that we find online, in books and from our own personal experiences
  • Lots of great information for Stained Glass (Tiffany and Leaded), Lampworking, Fusing, Slumping, Glass Painting, Sandcarving, Mosaics and more
  • Lastly, HARRACH is pronounced, Hair - wreck
Showing posts with label score glass. Show all posts

Thursday, February 2, 2012

Breaking Pieces From Large Sheets of Stained Glass - Straight Lines


Use a cutting square or other non-slip straight edge to guide the cutter. You can push as in normal stained glass cutting, or you can draw the cutter toward you as glaziers do. In either case, the pressure needs to be even and the speed consistent.

In moving large scored sheets, avoid pulling by the end. The score may run suddenly and not always along the line. Instead, move the sheet with support on both sides of the score. After the glass is scored, you have choices about how to run the score:
One easy way is to move the sheet so the scored line is just inside the edge of the bench. The biggest piece will be on the bench and the smaller piece in your hands. Give a quick, sharp downward push with both hands on the overhanging glass. Having the glass score inside the bench edge gives you a place for the broken off piece to rest, rather than pivoting toward the floor.
You can slide the straight edge under the glass on one side of the score, and press firmly, but not sharply on each side of the score. The glass will break evenly along the score line. This is a more gentle method of breaking the glass. A variation on this is to place a couple of match sticks or glass painting brushes at each end of the score and apply the pressure.
If the glass sheet is of a size that you can hold it in both hands with the score between, you can draw it off the bench, let it hang vertically, and bring your knee up briskly to hit the score line, and it will break easily. This is a showman's way of breaking glass sheets when the score line is approximately centered on the sheet.
Cut running pliers often do not work very well on long straight scores on large sheets of glass. However, if you try this, tapping along the score line before squeezing the running pliers will help the score to run the way you intend. (And defeat the purpose of getting a clean break, as each time you tap the glass you get a ledge on the side of the score line that you tapped). This is sometimes the only way to achieve the break of the score.

Wednesday, August 24, 2011

All about glass cutters!

When you hold your glass cutter does it feel uncomfortable? Do you have trouble seeing the wheel the entire length of the score?

Being uncomfortable and not being able to see the wheel are just some of the problems encountered when you are cutting stained glass. Learn about the different types of glass cutters, for stained glass, and how to use them. Many of your problems can be solved by using the cutter that suits you best.


You can hold your glass cutter any way that feels comfortable to you as long as:

1. You can always see where the wheel is in relation to
the line you are cutting along.

2. The cutter is always absolutely perpendicular to the glass.


Oil Versus No Oil


All glass cutters that I will be talking about, for cutting stained glass, are oil filled cutters. There is always a big discussion as to whether to use oil or not. Just because there is a chamber that can be filled with oil, some people prefer not to use oil in these cutters.

I have always used oil, even back in the "good old days" when oil cutters were non existant. At the end of this page, you will see the type of cutter I learned with. Even then, I always dipped my cutter in a small jar that had an oil soaked cloth on the bottom. This kept the wheel lubricated and running smoothly.

I feel that oil is needed to lubricate the wheel of any glass cutter. It keeps the wheel of your glass cutter turning smoothly, and free of tiny glass chips that can lodge between the wheel and the shaft. It is also needed to keep the score clean and cool. It helps to prevent minute chips of glass from flying about. The final reason I use oil is because it preserves the life of the wheel. Did you ever listen to a dry cutter going over glass? It sounds like you're dragging it over sand paper. In my opinion, that shortens the life of the wheel.

To fill your glass cutter with oil, unscrew the brass cap on the end of the cutter and remove it. Fill the barrel with oil to about 1/3 to 2/3 full. Replace the brass cap. To regulate the flow of oil, open the brass cap about 1/2 to 1 full turn. Totally unscrewed will make the oil run fairly fast (not a good thing), and full closed will give you very little or no oil at all. Experiment with your cutter. They all seem to flow a bit differently. When your cutter is not in use, tighten the cap so that oil doesn't leak out.

What kind of oil should you use in your glass cutter? There is special cutting oil available at your local stained glass shop. I have also used sewing machine oil, 3-in-1 oil, lamp oil and kerosene, all of which work for me.  Right now I use lamp oil, as I have an abundance of it, and it's cheap. My pistol grip cutter has not been used for several years, and I left it laying flat with oil in it. The inside is stained from the oil.

oil stained pistol grip glass cutterHere is what it looks like now. Not a pretty sight, even after I made a valiant try to clean it out! On the bright side, the wick still feeds oil and the cutter works like a charm.


An alternate suggestion for oiling the wheel of your glass cutter is to keep a small amount of oil in a shallow container with a sponge or a piece of cloth in the bottom. Fill the contained with just enough oil to soak the sponge or cloth. Rather than filling the oil chamber of your glass cutter with oil, just roll the wheel over the oil soaked sponge or cloth before every few scores. That will keep the wheel lubricated.


Taking Care Of Your Glass Cutter


There are a few simple things you can do to preserve the life of your glass cutter...especially the wheel.

First of all, don't ram the wheel over the edge of the glass when you are finishing a score. That will eventually chip, or at least dull the wheel. A gentle roll over the edge is quite sufficient to finish the score. You don't need to let up on the pressure just be aware that you are getting close to the edge and be ready to gently roll the cutter over the edge.

If you don't use your glass cutter frequently, don't fill it absolutely full of oil. The oil deteriorates over time and will stain the inside of the barrel. The oil becomes thick and darkens. It makes a mess in the barrel and is very hard to clean out. A small amount of oil will last a long time. I'd recommend filling the barrel about 1/3 full.

When you are storing your glass cutter, leave it upright rather than laying on it's side. There is a cotton wick that runs from the oil chamber to the head of the cutter. Leaving the cutter upright will keep oil feeding the wick. If the wick gets dry, it will take a minute or so to get the wick saturated so the self oiling can begin.

When you have your glass cutter apart to put a new wheel on, don't pull the piece of string out, thinking it's something that shouldn't be there. It's the wick and the lifeline between the oil chamber and the wheel. I've had students come to me holding a "piece of string" they pulled out of their glass cutter. Believe me, it is an impossible task trying to put that wick back. Once the wick is out, you will no longer have a self oiling glass cutter. You will have two choices: either buy a new glass cutter, or use that one by dipping it in oil every few scores.

Every now and then, hold the cutter up to the light so you can see between the wheel and the head. You will be looking for tiny pieces of glass that might get lodged in there. If you see any, take a fine needle or pin and poke it through the opening (which is very small). That should push out any debris that is in there.

If your wheel is scoring a dotted line the wheel is chipped. If you are having to use more and more pressure to score the glass, the wheel is dull. It is time to buy a replacement wheel.


Types of Cutters
and How to Use Them


There are many brands and types of glass cutters for stained glass work. The two most commonly used types are the pencil grip and the pistol grip.


Pencil Grip Cutters


To learn about the Pencil Grip Glass Cutter,
click here: Pencil Grip Glass Cutters


Pistol Grip Cutters


Pistol Grip Glass CutterTo learn about the Pistol Grip Glass Cutter,
click here: Pistol Grip Glass Cutters


Two glass cutter, for cutting stained glass, that I really like are the Custom Grip and the Thomas Grip, made by Toyo. Both are small, and rather than holding them like a pencil or a pistol grip they have a saddle that sits between your thumb and index finger. As a result, they give you a lot of flexibility and take less strength to make a score line.

These two cutters are used less often than the pencil or pistol grip, but I think many people would switch to either one if they had a chance to try them and see how easy they are to hold and control.


Toyo Custom Grip Cutter


custom grip glass cutter


To learn about the Toyo Custom Grip Glass Cutter, click here:Toyo Custom Grip Glass Cutter


Toyo Thomas Grip Cutter


Toyo
To learn about the Toyo Thomas Grip glass cutter,
click here: Toyo Thomas Grip Glass Cutter


How to Cut Along a Straight Edge


cutting along a straight edgeTo learn How to Cut Along A Straight Edge,
click here: Cutting Along A Straight Edge


A Few Final Comments


As I said before, there are many brands of glass cutters for stained glass, both oil filled and non-oil filled. Each one has it's own merits and all should be investigated before you make a decision. I have used Toyo brand in all of the pictures above, because Toyo was the first to make oil filled cutters and that is what I started with. I've never seen any reason to change.

There are a couple of mechanical glass cutters that have a cutting wheel built in. With the Cutter's Mate you simply push and pull a handle to keep the cutting wheel going in the direction you want to cut, while the glass is laying on a flat surface. It sort of reminds me (in looks) of an old fashion pentograph, but is much more flexible and goes in any direction. The people that use it, love it. The other one is the Score One. This one is a two handed operation. You guide the glass with one hand and turn a wheel (sort of like a small version of a wheel on a sewing machine) with the other hand. It is also well liked by the people that use it.

I prefer to do it all with a glass cutter, by hand. Actually, I really enjoy cutting glass. However, if you have a lot of trouble cutting glass, just plain don't like cutting glass, or can't hold your glass cutter for physical reasons, then investigate the Cutter's Mate or the Score One. One of them might be the answer to your problems.


One last comment:

Steel Wheel Glass CutterThis is the type of cutter I learned with. It certainly made glass cutting a challenge. It takes a lot of pressure to score the glass, and it makes your hand and wrist sore very quickly. Also, the wheel dulls at an amazing rate, so you frequently need to purchase a new cutter. What a joy it was the first time I used an oil filled cutter. And it has continued to be a joy every time I cut glass. If this is your glass cutter, do yourself a favor and get an oil filled cutter. You will never regret it.


Thank you Free patterns for stained glass for writing this very informative and helpful information on glass cutters!  They are one of the most important tools used with art glass and without a good cutter, glass pieces may not cut or break as intended!

Tuesday, May 3, 2011

How to cut glass effectively and accurately by Steve Immerman, first published in Glass Craftsman - Winter 2011


Being able to successfully cut glass is obviously a prerequisite to successful kilnformed glasswork. Perhaps it is not the most exotic topic, but understanding the basic tools and techniques and developing the necessary skills are fundamental to success. There are many different ways to cut glass, and I find I always learn new techniques from other artists. This article will discuss some of the common ways to cut 1/8” (3mm) fusible art glass, such as Bullseye, Uroboros or Spectrum. Thicker glass, highly textured glass, or window glass (float glass) may require other techniques that are slightly different from those needed to cut the art glass we kilnformers generally use.

The Theory Behind It
Although it is not absolutely necessary to understand all the physics behind the nature of glass, and how cutting affects the glass – having a mental model helps to dispel some of the mystery. Glass has been described as a “rigid liquid” or an “amorphous solid” – which sounds very oxymoronic. But, what that means is that it does not have a crystalline structure. The molecules do not line up in precise arrays, but instead are randomly situated with respect to one another—like a liquid. At very high temperatures glass does behave like a liquid, but at room temperature, it behaves like a solid. And, obviously, we will generally cut the glass at room temperature. The absence of a crystalline array of molecules means that there are no internal cleavage planes – so the strength is the same in all directions. What we want to accomplish when we “cut glass” is to control how, when, and where the glass breaks.

There are several simple tools for cutting glass. This article assumes one is using a basic rotary-wheel glass cutter, because for 1/8” glass that is usually all that is necessary. But there are other tools such as a tile saw, band saw, ring saw, and even a waterjet cutter that have distinct advantages in certain situations. I will cover selecting a glass cutter later on this article, but for now we will assume we are using a wheeled cutter with a carbide wheel, and that we run the wheel along the glass to create a “score line”. We then break the glass at that score line.


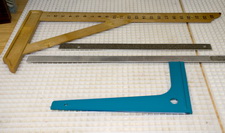
Straight edges and right angle tools for guides.
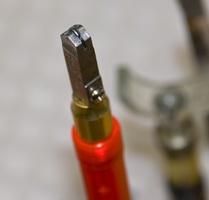
The tip of a carbide wheel cutter. 


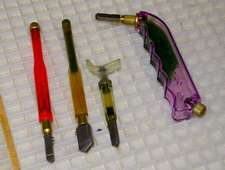
Various handles on glass cutters.

If you take a piece of glass and try to break it without first scoring it, it will seem quite strong and will resist breaking. It will bend a little, because the force you are applying is evenly applied all over the glass. But, at some point, if you continue to apply force - it will break. You will have no control over where it breaks, exactly when it breaks, what the shape of the break will be, or how many pieces it will break into. You will probably cut yourself as well.

However, if you score the glass first, it will break along the score line with considerably less force than was needed to break an unscored piece of glass. When you score a sheet of glass, you are disrupting the surface of the glass, and creating a line of microfractures deep into the glass from the pressure concentrated by the edge of the wheel. The glass is now stressed at that point, and it will take very little external pressure to cause it to separate along the score line. Interestingly, a score line, if left alone long enough, will begin to repair itself. This is similar to you running your hand through water – the trough created by your hand rapidly fills in. Glass does this, but very, very slowly as demonstrated by photomicrographs taken of a score line over a period of time.

For a detailed discussion on cutting circles and rims, check out the tutorial by Patty Gray on this page below.

Tools for Scoring the Glass
There are various kinds of glass cutters, but almost all have a carbide wheel in some sort of cutting head, attached to a handle. Some cutters are meant more for cutting straight lines, others for curves, and they are usually labeled as to their intended purpose. There is even one called a “tap wheel” that is designed to vibrate as it cuts, providing a deeper zone of microfractures. These are not the most expensive tools you will have in your shop, so it is worth getting a good quality cutter. Wheels from Toyo are readily available and are high quality.

The shape of the cutter handle is more of a personal preference. Cutter handles come with pencil shapes, “T” shapes, or “pistol grip” configurations. I personally prefer the Toyo Thomas Grip “T” shaped cutter, but I keep all three at my table, and during prolonged periods of cutting, I switch from one to another to prevent repetitive stress injury.
The other issue is whether it is necessary to score with a dry cutter, or have some sort of lubricant either in the cutter or on the glass. The reason for the lubricant is not only to lubricate the wheel, but to get into the score line to facilitate the subsequent break. I have always used a lubricant in my cutters, but I’ve heard others vehemently recommend cutting dry – and others who brush a liquid over their score line after scoring. I can’t say I have any data to support one side or the other. My guess is that for our purposes it doesn’t really matter. I think that you have to try a variety of ways and decide which works best for you.
Scoring the glass can be done on any flat surface, as long as it is free of particulate matter and completely flat. Many people use a cutting surface like the one in the Morton cutting system, because it is composed of a ½” lattice that allows the glass chips to fall away from the working surface. Others prefer using a tabletop covered with carpeting. A hard flat surface will need to be swept or vacuumed frequently to prevent glass chips from creating an uneven surface under your glass which can cause unwanted breakage and scratches.

Scoring Technique
The basic concept is that you should hold the cutter perpendicular to the glass, apply even pressure, and roll the cutter along your proposed score line – starting at one edge of the glass and ending at the other. For perfectly straight lines, running the cutter along a straight edged ruler or guide is necessary. Make sure to apply pressure all along the score line – especially at the beginning and at the end. It doesn’t matter if you run the cutter toward yourself, or away. Again, I’d suggest trying both, and doing what is comfortable for you. If you are following a pattern line on the glass it is usually better to score away from yourself so you can see the line and follow it precisely. You may find that the type of cutter you use and the length of the score line changes your mind about what is comfortable in a particular situation. The glass should be clean before scoring. It is easiest to cut the glass on the smoothest side because the cutter head will have equal contact with the surface of the glass – but it can be scored on either side.

 
Various breaking and running pliers. 


The kind of running pliers I use most often, note the curve to the tips and the rubber covering.

It is said that you want to apply three to five pounds of pressure on the cutter – however in the studio it is almost impossible to actually know how much pressure you are applying. Applying too much or too little pressure will adversely affect the ability of the glass to break cleanly and accurately. This is something where practice helps. Unfortunately, different brands and different colors of glass will behave differently. I use Bullseye glass, and it is has become obvious to me that the harder opal glasses (white, or French Vanilla) require more pressure than softer glasses (black, or transparent). There is a distinctive and satisfying zzzzzst sound that the cutter makes as it scores the glass that you will learn to appreciate with time.


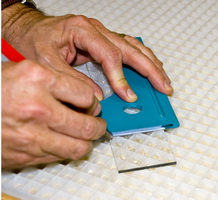
Using a right angle tool to cut the glass. Note, that during the actual cutting the cutter should be more vertical than shown in this image.


A score line that has been partially "propagated" note the reflective surfaces within the cut on the right side.

Breaking the Glass
After scoring the glass the next step is to break it along the score line. There are numerous ways to do this, and how you accomplish this will depend on the type of score line, the size of the glass pieces you are breaking, the tools at your disposal, and your comfort level with the various techniques. This article addresses straight lines and simple curves in 1/8” glass sheet. Circles, ovals, thicker glass, and tight inside curves have their own tools and techniques.

Interestingly, as opposed to most things that we cut in our lives, the location of the score line with respect to the edges makes a difference. In other words, it is just as easy to cut a piece of paper or wood in half, as it is to cut a small strip off the edge. This is not the case when cutting glass and there are a few interesting facts:

It is easier to get a clean break far from the edge of the glass than close to the edge. (in other words, it is difficult to break off a long, thin strip of glass and much easier to break off a wider strip)
When cutting narrow strips, it is easier to get clean breaks if you keep cutting the width of the strip in half, rather than trying to cut small strips off a large sheet. 

As the width of the strip you want to cut approaches the thickness of the glass, getting a clean break becomes harder. It is not possible to cut a strip the same width or thinner than the thickness of the glass. Therefore, if you are cutting 1/8” thick glass, cutting and successfully breaking anything less than ¼” can be difficult.

The general concept of breaking along the score line is to apply upward pressure underneath the score, and downward pressure on the rest of the glass. Before the actual “break” occurs, the score line must be “propagated”. This is best demonstrated on a sheet of transparent glass. Once a score line has been created, you may see areas where it appears that the glass has already separated below the score by virtue of the fact that you can see a crack with reflective surfaces – yet the glass has not yet separated into two pieces. If you turn the glass over on a soft surface (like a carpet or thick newspaper) so that the score line is in contact with that surface, and press firmly on the score line on the unscored side of the glass, you can see this crack travelling along the score line. Once this crack has been propagated from one edge of the glass to the other, the glass is probably in two pieces already. In most situations, propagating the score line and breaking the glass seem to occur simultaneously. However in situations where you are cutting a complex curve or having trouble getting the glass to break easily, propagating the score first may be helpful. In addition to the method mentioned above, gently using running pliers, or tapping the unscored side of the glass directly under and along the score line may work as well.

In most situations, you will not need to consciously propagate the score line as a separate step – and you can just proceed to simultaneously propagating and breaking. The most important aspect of this next step is safety. Your glass is now unstable because of the score line, and can fall apart when you least expect it. You also have to pay attention to what is going to happen to the two pieces of glass after they separate so they don’t fall and shatter or cut you. Whatever maneuver you choose, if you feel uncomfortable that you are going to expose your hands to an unprotected sharp edge in an uncontrolled fashion – find another way to accomplish the break.

Here are a few ways you can break the glass:
Use a running pliers applied parallel to the score line. These are designed to apply upward pressure on the score line, and downward pressure on the adjacent glass. For a long score line, you may want to apply the pliers very lightly at one end – just until you hear a faint click, then turn the glass around and apply pressure with the pliers at the other end to complete the break. 

Turn the glass scored-side down on a soft surface and press on the unscored side along the score line.
Align the score line with the edge of your work surface, and apply downward pressure on the edge of the glass overhanging the edge. Wearing protective gloves is a good idea when doing this.
Thin strips of glass can be broken crosswise into shorter pieces with a maneuver similar to breaking a pencil in half. 

A cord, string, or monofilament can be stretched across a flat surface, and the score line can be positioned over the cord. Pressure on both sides of the glass will cause it to crack on either side of the cord.
Use your hands to break the glass: grasp the glass on either side of the score line, thumbs on top and curled fingers underneath, and applying force down and out with your thumbs, and up with your curled fingers. Be sure to position your thumb and fingers so that they will not be cut when the glass separates.
Use two pairs of breaking pliers to break the glass, one on each side of the score line, with the jaws parallel to one another and parallel to the score line. Apply downward pressure to open up the break along the score line. This only works if the size of the glass being cut allows the pliers to almost touch each other.

Troubleshooting
Not everything always works out the way you want. Sometimes the glass just will not break as you expect. When that happens; there are a few things you can try.

Make sure that your cutter wheel is perpendicular to the glass in all directions.
Vary your pressure, using either greater or lesser to see which works best for that particular sheet of glass.
Make sure you are keeping even pressure on the cutting wheel at both the beginning and the end of your score. 

If you are applying pressure and the glass is not breaking as you expect – stop. Flip the glass over and try cutting the other side of the glass, even if it is not as smooth as the side you were working on.
If as you are scoring the glass - it just doesn’t seem like you did it right – flip the glass over and try the other side. Do NOT go over a score line again on the same side of the glass. You will not improve the score, and may damage your cutter. 

Try a different method of breaking the glass.
When you score a sheet of glass you start the score line at one end of the sheet and finish at the other. If you are applying running pliers at the “finish” end and it is not working, try the “start” end instead.
There are times, when a particular sheet of glass just doesn’t want to behave the way you expect. Try another sheet until you regain your technique. 

Take a break. This just may not be your day for cutting glass. 

Accuracy
One of the most frustrating problems can be inaccurate cutting. Here are a few tips that may help:
Very often we are cutting right angles to make squares or rectangles. A simple right angle tool is very helpful with this, and several are available with a ridge to allow the tool to rest along one side of the glass.
Mark where you are going to cut with a Sharpie© type marker, and making sure your cutting wheel is right on the mark. 

Put cork backing on your straightedge tool to prevent slippage. Cork-backed rulers, or cork tape is available at many stained glass supply stores.

If you are using glass with a rolled edge, it is best to cut that edge off first using a right angle tool to create a perfect 90 degree angle on the sheet (“square off” the sheet).
The Morton System consists of a line of tools that help with cutting precise angles – and some people find this very helpful. 

There are dedicated strip cutters that facilitate cutting many uniform strips.

Safety Issues
You should always use eye protection when dealing with glass. Small splinters can go flying through the air, and you definitely don’t want them getting in your eyes. Do not touch or rub your eyes while working with glass. 

Never hold glass by the cut edge – but rather by holding the flat surfaces. 

Always be aware of what will happen to the glass after it is cut – and if it is going to fall – let it, rather than trying to catch it. 

Always wear shoes with covered toes when working with glass. 

When we cut glass we want a squared off edge – but often there is an area where the glass breaks in a sharp bevel, much like the edge of a razor blade. These can be extremely sharp – and should be ground off immediately or you risk cutting yourself. If you have a triangular scrap with a very sharp point, you should grind or break that point off – or you risk stabbing yourself. 

I find that most cuts occur when when reaching into the glass rack or scrap bin trying to remove a particular piece, or putting sheets of glass into the racks. Protective gloves should be worn at those times.
If you get a small glass splinter, try applying a piece of adhesive tape over the splinter and then removing the tape, with hopes that it brings the splinter with it. You can purchase a “splinter removal kit” with very fine tweezers that are excellent for removing deeply embedded splinters.
Conclusion
I hope this article has helped the beginners, and maybe provided an interesting fact or two for the experts. I wish you safe and accurate cutting!

Many thanks to Clearwater Glass Studio http://www.clearwaterglass.com/Tutorials/CuttingGlass.html for posting this excellent tutorial.


Cutting Circles & Circular Borders or Rims

Here Patty Gray teaches her simple circle-cutting technique.
 Following that, she demonstrates how to cut a perfect
 circular or oval RIM for a plate, platter or other glass
 design. Properly executed, these cuts will require neither
 grinding nor grozing, and, with Spectrum glass, are easy
 to accomplish.

Patty prefers cutting on a surface of carpet or padding.
She cleans the glass first, which extends cutter life. In this
demo, Patty is using a Silberschnitt circle cutter. Other
 models, like those from Inland or Glastar will do.

Working from a more-or-less square sheet, Patty locates
the circle-cutter at circle-center and makes sure she has
at least 1/2-inch (1.25cm) clearance on all sides.

Then, she practices the rotation of the cutter-arm to
ensure that its path is free of obstructions.


Once the circle-cutter is properly positioned,
she marks the center for future reference.
(Knowing the center can come in handy later).

Patty oils the cutter-head before scoring.
She uses a cutter oil-soaked cloth placed in a jar lid.

She rotates the cutter-arm, scoring the glass 360 degrees
in a smooth motion with even pressure.
Then, she removes the circle-cutter.

Next, Patty carefully turns the sheet over,
so that the scored side is down.


Then she applies pressure directly to the back side of the
score. In transparent glasses, you can see the score
propagate, or "run" along its path. In opal, or denser
glasses, you can see a "dimpling" occur as the score runs
its course.

Remember to press gently. Smaller circles require more
pressure, because the glass doesn't flex as easily. Seek to
"run" the score completely around your circle or oval. Go
over the score line a few times, all the way around, until
you are satisfied the "run" is complete.

SEARCH FOR ART GLASS INFO!

Follow Our Blog

Blog Archive

These are some of our most popular subjects

50/50 solder (2) 60/40 solder (2) Borax (2) Boron Nitride spray (3) Bullseye (5) COE (11) Dalle de Verre (2) Didymium glasses (2) Effetre (2) Evenheat (4) Glass Eye 2000 (2) Moretti (3) Morton System (3) Primo Primer (3) RampMaster II (2) Tiffany (5) YouTube (85) air bubbles (5) annealing (6) art glass (10) bead (8) beads (6) bottle (8) breaking glass (2) broken pane (2) came (2) carbide wheel cutter (2) casting (10) cement (10) chat (1) color (2) compatible (2) compatible glass (4) contour fuse (2) copper (4) copper foil (7) crushed glass (3) cutting (8) cutting circles (2) cutting glass techniques (2) dalles (3) design (7) devitrification (5) devitrification spray recipe (2) dichroic (9) digital controller (4) dots (4) drill hole in glass (3) enamel (6) enamel paints (2) encase (3) epoxy (2) etching (5) faceted glass (3) fiber paper (7) fid (2) fire brick (4) fire polish (2) fire safety (2) firing schedule (26) flashed glass (2) flux (8) foil (7) frit (25) full fuse (6) furnace glass (3) fused glass (26) fusing (72) glass (33) glass bead (5) glass blowing (3) glass bottles (5) glass casting (9) glass clay (3) glass cutter (8) glass cutting (4) glass kiln (10) glass painting (18) glass powder (6) glass rod (9) glass stain (3) glue (3) grinder (3) grinder bits (2) grout (2) hake brush (2) harrach glass (158) hot glass (5) hot head (3) how to set up a torch (2) jewelry (4) jewels (3) kiln (106) kiln furniture (3) kiln schedule (20) kiln shelf (3) kiln wash (15) kilns (7) lampwork (47) lampwork press (2) lampworking (8) lead came (11) lead knife (3) leaded glass (12) mandrels (4) mold (13) molds (17) mosaic (6) oxidation (1) pate de verre (5) patina (2) pattern (5) pattern bars (6) pendant (7) pot melt (5) powder (1) presses (3) reactive colors (2) recycled glass (9) reducing flame (2) repair (10) resist (6) restoration (3) reusche (5) safety (7) sandblasting (6) schedules (4) score glass (3) sheet glass (5) shelf paper (4) shelf primer (6) slumping (14) soft glass (4) solder (10) soldering iron (4) stained glass (22) stained glass window (7) steel mold (3) stringer (6) supplies (4) tack fuse (4) thermocouple (5) tools (5) torch (13) tutorial (76) video (88) wine bottle (16)

Search tags from previous posts here!

104 coe (1) 220 volt (1) 50/50 solder (2) 60/40 solder (2) Aanraku Frit Maker (1) Aanraku Frit Sorter (1) abrasive (1) accent (1) acids (1) advertise (6) agreement (1) air bubbles (5) air compressor (2) aluminum oxide (1) android (1) annealing (6) aperature pour (1) app (1) Arrow Springs (1) art (3) art glass (10) ArtGlass Clay (1) artist (2) avatar (2) Banner (2) bar code scanner (1) Baroque (1) base metals (1) bead (8) bead door (1) bead release (1) bead release recipe (1) beads (6) beer bottle (4) bending glass (1) Bethlehem (1) Betta (1) betterstainedglass.com (1) bevels (1) bgartman (1) billet (1) billets (2) bisque (1) black (1) black backed foil (1) Blenko (1) blog (7) blogger (3) blowing (1) Bobcat (1) books (2) Borax (2) Boron Nitride spray (3) Borosilicate (1) bottle (8) bottle cutter (3) bottle glass (1) bottles (1) boxing (1) brass (1) brass frit (1) breakers (1) breaking glass (2) brick and mortar (1) broken pane (2) bronze (1) building owner (1) Bullseye (5) Bullseye powder (1) Bullseye reactive glass chart (1) business (6) business license (3) butterfly (1) buy (1) cabbage leaf mold (1) came (2) came bender (1) came saw (1) camera (1) candles (1) candy dishes (1) cane (1) Canterbury Cathedral (1) carbide wheel cutter (2) Carlisle (1) Cast-A-Cab Molds (1) casting (10) Cathedral glass (1) Catspaw (1) Celsius (1) cement (10) cement recipe (1) ceramic kiln (1) ceramic mold (1) chain (1) change shop name (1) Chantal's stained glass (1) chat (1) Cheetah (1) Chestnut Ridge Designs (1) chunk glass (1) circle (3) clashing (1) clay (2) clean (1) cleaning copper (1) clove oil (2) cmc (1) CMC powder (1) coaster (1) Coatings by Sandburg (1) COE (11) COE testing card (2) color (2) color wheel (1) Colour de Verre molds (2) commercial (1) compatible (2) compatible glass (4) competition (1) compounds (1) conservation (1) contact paper (1) contour fuse (2) cookie cutters (1) cool (1) copper (4) copper backed foil (1) copper foil (7) copper foil mil (1) copper sulfate crystals (1) copper wire (1) cord (1) Corinabeads (1) Corning Museum of Glass (2) corporation (1) cracked pain (1) crackle glass (1) cracks (1) crafts (1) craigslist (1) Creative Paradise molds (1) Creator's Premium Bottle Cutter (1) Crowley (1) crushed glass (3) curdled (1) custom ceramic molds (1) cut outs (1) cutting (8) cutting bottles (3) cutting circles (2) cutting glass techniques (2) cutting oil (1) cutting square (1) Dalle de Verre (2) dalles (3) dam (1) Danielle Moore (1) decals (1) Delphi Glass (1) design (7) devitrification (5) devitrification spray recipe (2) dichroic (9) Dichroic Extract (1) Didymium glasses (2) digital controller (4) disk bead (1) display (1) disposal (1) distorted fused glass shape (1) domain (1) door (1) Dos and Don'ts (1) dots (4) dragon scale bead (1) drapery glass (2) draping (1) drawing (1) Dremel (2) drill hole in glass (3) drinking glasses (1) drop out ring (1) dust collector (1) dusts (1) dykes (1) earrings (1) Effetre (2) electric kiln (1) electric kiln sitter (1) electricity (1) element (2) elements (2) elmers rubber cement (1) enamel (6) enamel label (1) enamel paints (2) enameling (3) encase (3) encased (2) English Muffle (1) engrave (1) entrepreneur (4) epoxy (2) equipment (1) etching (5) Etsy (7) Etsy card reader (1) Evenheat (4) evenheat kiln (1) expenses (1) exposure (1) facebook (6) faceted glass (3) Fahrenheit (1) fan page (1) favorite item from the shop above you (1) feathered lampwork bead (1) feature your artwork (1) fiber board (2) fiber paper (7) fid (2) fire brick (4) fire polish (2) fire safety (2) firebrick (2) firing schedule (26) first firing (1) fit glass window to frame (1) flash (1) flashed glass (2) Flexi-Glass (2) float glass (1) floral former (2) flower (1) flower pots (2) flux (8) foil (7) foil shears (1) follower (1) following secrets (1) font (1) font generator (1) for sale (1) forum (1) Fracture and Streamer (1) frame (1) Frantz (1) free stained glass patterns (1) freeze and fuse (1) frit (25) frit casting (1) frit casting molds (1) frit crusher (1) frit sorter (1) front load (1) full fuse (6) fumes (1) furnace glass (3) fuse (2) Fuse It Test Card (1) fused (13) fused glass (26) fused glass decals (1) fused hearts (1) fused lamp (1) Fusemaster (1) fusible (2) fusing (72) fusing book (1) fusing medium (1) gain followers (2) garnet (1) general proprietorship (1) generator (1) gift (1) gigabytes (1) gingerbread man (1) Glaskolben (1) glass (33) glass bead (5) glass beads (3) glass blowing (3) glass bottles (5) glass burrs (1) glass casting (9) glass clay (3) glass cutter (8) glass cutting (4) glass cutting safety (2) Glass Eye 2000 (2) glass kiln (10) glass log (1) glass nippers (1) glass painting (18) glass powder (6) glass rod (9) glass saw (1) glass stain (3) glassline paint (1) glazing hammer (1) glue (3) Gluechip (1) goddess (1) google (1) grain (1) grinder (3) grinder bits (2) grinding glass (1) group (1) grout (2) grozing (1) Gryphon (1) Gryphon bandsaw (1) Gtt Cricket (1) gum arabic (1) haike brush (1) hake brush (2) Hakko (1) handkerchief mold (1) hang (1) hanging hook (1) Hanging Valley Art Glass (1) harra (1) harrach glass (158) harrachglass (2) hazardous waste (1) history (1) hobbies (1) holding agent (1) hollow bead (1) home made frit (2) home owners association (1) Horkover Glass (1) horseshoe nails (2) hot (1) hot glass (5) hot head (3) hot working (1) house sign (1) how to (2) how to clean (2) how to open a new store (1) how to set up a torch (2) HTML (2) IGGA (1) incompatible glass (1) info appearance (1) Inland (1) installation (2) insurance (1) internet (3) iPhone (1) IR damage (1) Iridescent (1) iridized (1) ivory (1) japan drier (1) jar (1) jars (1) Jennifer Geldard (1) jewelry (4) jewels (3) joist (1) jump ring (1) Kaiser Lee Board (1) Kalera Stratton (1) Katie Gee Designs (1) kiln (106) kiln book (1) kiln furniture (3) kiln lid (1) kiln repair (1) kiln schedule (20) kiln shelf (3) kiln wash (15) kilncasting (1) kilnformed (1) kilns (7) Knight Bullet (1) Kokomo (3) Kokomo glass (1) label (3) Lamberts (1) lamp (1) lampwork (47) Lampwork Etc. (3) lampwork press (2) lampworking (8) lampworking frit (1) landlord (1) LavaCloth (1) lavender oil (1) layout (1) lead (4) lead came (11) lead knife (3) lead nippers (1) lead shears (1) lead vise (1) leaded (1) leaded glass (12) lease (2) leaves (1) lids (1) limited liability company (1) limited liability partnership (1) limited partnership (1) linseed oil (1) liquid stringer (1) liquid stringer medium (1) Lisa Horkin (1) live (1) location (1) lost wax casting (1) Lynx (1) magazine (1) Magic Mender (1) mandrel size chart (1) mandrels (4) manual (2) manufacturers (1) market (1) marketing (1) measure (1) melting points (1) merchant service (1) metals (2) microwave (1) microwave kiln (2) minerals (2) mini phaser (1) mirror (1) mold (13) mold mix 6 (1) molds (17) Moretti (3) Morton board (3) Morton System (3) mosaic (6) mosaic history (1) mouth blown (2) MR-97 (1) Mr. Splash (2) Muff (1) Murano Italy (1) muriatic acid (1) Mustang Dawn (1) Naos (1) needle nose (1) negotiate (1) net (1) network (1) network team (1) neutral flame (1) neutrals (1) newspaper (1) NNN (1) no days liquid fusing adhesive (2) noodles (2) Nortel (1) nuggets (2) off mandrel (1) oil based (1) online (1) onsite (1) opalescent glass (1) opaque glass (1) organizations (1) outlet (1) oval (1) oxidation (1) oxides (1) oxidizing flame (1) oxygen (2) oxygen concentrator (1) packaging (1) paint (3) panel (2) paradise paints (1) Paragon (2) parts (1) pate de verre (5) patina (2) pattern (5) pattern bars (6) pattern shears (1) patterns (3) Patty Gray mold (1) paypal (1) Pebeo (1) peep hole (1) pen (1) pencil grip (1) pendant (7) pendant mold (1) permits (1) petals (1) Peter McGrain (1) Phantom (1) photography (4) pine oil (1) Pinterest (1) Piranha (1) pistol grip (1) plaster (5) plastic beads (1) plating (1) Play Doh Fun Factory (1) pmc (1) pocket vase (1) poison (1) posts (3) pot drop (1) pot melt (5) powder (1) power cord (1) preparing kiln (1) presses (3) pressure blaster (1) pressure pot (1) pricing (1) primary colors (1) Primo Primer (3) printable (1) profile (2) program (3) programmable (2) propane (3) proper clothing (1) propylene glycol (1) psi (1) punty (1) purple (1) putty (2) putty recipe (1) pyrometer (3) qr (1) qr code (1) rain drops (1) raking (1) raku (1) ramp (1) rampmaster (2) RampMaster II (2) reactive colors (2) recipe (1) rectangle (1) recycle (5) recycled glass (9) Red Max (1) reduce air bubbles (1) reducing flame (2) reference (2) relay (2) rent (1) repair (10) residential (1) resin (1) resist (6) resources (1) restoration (3) retail (4) reusche (5) reverse painting (1) Rio Grande (2) rod (1) rod storage (1) rods (1) rondels (1) roulette tool (1) round bead (1) rubber (1) rubber cement (1) rubbing alcohol (1) running pliers (1) s hook (1) safety (7) safety glasses (3) Sairset (1) sand (1) sand blaster (4) sand blasting (5) sand carving (4) sandalwood amyris oil (1) sandblasting (6) Sandblasting abrasives (1) sander (1) saw (1) schedules (4) score glass (3) scoring glass (1) scrap glass (1) Scrap Master (1) screen printing (1) secondary colors (1) sections (1) secure server (1) Seed beads (1) segments (1) sell art work (1) sell crafts (1) service provider (1) serving plates (1) shapes (1) shards (1) sharpie marker (1) sheet glass (5) shelf melt (1) shelf paper (4) shelf posts (1) shelf primer (6) shipping (1) shop (1) shop announcement (1) shop languages (1) shop name (1) shop policies (1) shop profile (1) shop settings (1) shop title (1) sifter (1) silicon carbide (1) silicone mold (2) silicosis (2) silver (2) silver backed foil (1) silver foil (1) silver stain (2) silvered ivory (1) sink (1) sis (1) Skutt (3) slump (8) slumping (14) Slumpy's (3) small business (3) snowman (1) social media (3) soda lime glass (2) soft glass (4) software (3) solder (10) soldering iron (4) sole proprietorship (1) spectrum (1) Spectrum system 96 (2) Squeegee Oil (1) St. Just (1) stained glass (22) stained glass painting (1) stained glass pattern books (2) stained glass patterns (2) stained glass studio (1) stained glass window (7) stainless steel mold (4) stains (1) stamps (4) steel mold (3) steel pipe (1) Steider Studios (1) Steider Studios Glass Medium (1) stemware (1) stencil (3) stepping stone (1) store (3) straight edge (1) stretch lead (1) stringer (6) strip cutters (1) striped (2) stripes (1) stud (1) studio (5) stumbleupon (1) styrofoam (1) sugar skulls (1) supplies (4) surface tension (1) swiss cheese (1) System 96 (2) tack fuse (4) target audience (1) team (2) temperature (1) temperature controlled iron (1) temperature controller (2) temperature converter (1) tempered glass (1) template (2) tertiary colors (1) text (1) texture (2) texture molds (1) textured glass (2) THE Networking Team (2) thermal shock (1) thermocouple (5) thick glass (2) Thompson Enamels (1) threads (1) Tiffany (5) tile (1) tools (5) top load (2) torch (13) torches (3) tourists (1) tracing black (1) tracing stained glass window (1) traditional (1) traffic (1) transparency (2) transparent (1) transparent glass (1) triangle (2) triple (1) trouble shoot (2) TTV photography (1) turpentine (1) tutorial (76) tweet (2) twisted cane (1) twisties (2) twisty (1) Twitter (7) twitter secrets (1) twitter tools (1) TypePad (1) unfollower (1) Universal Mold Coat (1) upcycled glass (1) Uroboros (2) Vanilla Shell (1) ventilation (1) venting (1) vermiculite board (1) Vetrofond (1) video (88) vinegar (1) vinyl (2) viscosity (1) Vitri-Fusaille (1) Vitrigel Glass Medium (1) voltage (1) volume (1) walnut shells (1) Wasser glass (1) water jet (1) wavy bead (1) waxing (1) Wayback Machine (1) weave glass (1) weave mold (1) webpage (2) webpage development (1) webpages (1) website (1) weight (1) Weller (1) wet packing (1) wet tile saw (1) Whale Firebird (1) white (1) whiting (2) wholesalers (1) wide heart (1) widget (2) wigwag (1) window (1) window display (1) window glass (1) windows (1) wine bottle (16) wine stopper (1) wordpress (1) woven (1) yellow pages (1) Youghiogheny glass (1) YouTube (85) Zephyr ring saw (1) zinc (2) zinc came (2) zoning (2) Zoozii's (1)
By Harrach Glass ©, 2015. Powered by Blogger.
 

blogger templates | Make Money Online