














| PROBLEM | PROBABLE CAUSE |
|---|---|
| Solder falls through seams to other side when soldering copper foiled pieces. | Soldering iron is too hot or you are holding the iron in one area too long. Put a damp rag or sponge under the area you are soldering. |
| Beading of seams is too flat. | Not enough solder. |
| Beading is lumpy -- peaks instead of flowing. | Iron is too cold. |
| Can't seam to get beading smooth. | Wrong kind of solder for job. Did you flux? Iron too cold or too hot. Too much or not enough solder. |
| Solder won't stick to copper foil or lead. | Did you flux? Copper foil may be oxidized; clean with vinegar, salt, and water solution. Lead may be oxidized; wipe clean, dry, and rub with fine steel wool or wire brush. |
| Solder splatters into little balls all over the glass. | Iron too hot; purchase rheostat for your iron. This will control the current to your iron and control the heat output. |
| Lead came melts and disappears before your eyes. | Directly touching the lead came with a very hot iron. Position solder at joint, iron on top. Let solder flow down on lead came. |
Showing posts with label lead came. Show all posts
Showing posts with label lead came. Show all posts
Wednesday, August 15, 2012
Soldering problems and tips, chart


Monday, September 19, 2011
Soldering irons for glass art
Again, we always recommend that our students purchase a soldering iron specifically made for stained glass. There are irons made for soldering pc boards that really won't work well for soldering foil or lead came.
Also when soldering lead came our studio glass artisans at Harrach Stained Glass always use temperature controlled irons or we plug our irons into a Mini Phaser which is pictured below. Just plug an iron into the Mini Phaser and control the iron's temperature by using the dial on the front of the unit.

We have found that a lot of glass artists prefer to use 60/40 solder for all of their soldering needs. At our studio we use 60/40 solder on copper foil and 50/50 on lead came. We also prefer paste flux for lead came and liquid flux for copper foil.
It is also important to always use an iron stand, to allow the iron to be easily laid down while still hot or plugged in, without burning a work surface!

There are quite a few different wattage irons available, such as 40w, 50w, 60w, 80w, 100w and 175 watts. Some irons have ceramic heating elements, which are supposed to last longer than non ceramic elements.
Weller

Hakko

Inland

Also when soldering lead came our studio glass artisans at Harrach Stained Glass always use temperature controlled irons or we plug our irons into a Mini Phaser which is pictured below. Just plug an iron into the Mini Phaser and control the iron's temperature by using the dial on the front of the unit.

We have found that a lot of glass artists prefer to use 60/40 solder for all of their soldering needs. At our studio we use 60/40 solder on copper foil and 50/50 on lead came. We also prefer paste flux for lead came and liquid flux for copper foil.
It is also important to always use an iron stand, to allow the iron to be easily laid down while still hot or plugged in, without burning a work surface!

There are quite a few different wattage irons available, such as 40w, 50w, 60w, 80w, 100w and 175 watts. Some irons have ceramic heating elements, which are supposed to last longer than non ceramic elements.
Weller

Hakko

Inland

Tuesday, September 6, 2011
How to repair a broken piece in a leaded glass window.
Occasionally a glass artist will be asked if they can repair a broken leaded glass window but are not sure how to go about repairing the piece. I think that repairing a leaded glass window is much easier than repairing a copper foiled window.
To begin with you should tape together what is left of the broken piece of glass. If necessary make a rubbing of the window. Tape a piece of white paper on one side of the window, lightly rub the window with a crayon or charcoal so that you can see the shadow of the lead came lines.
Next, remove the frame. If you have a zinc came frame, you need to use a temperature controlled iron so that you can turn down the heat. Then with the temp turned down, heat up and actually carefully move the solder from the soldered areas on the zinc came frame, use paste flux on the joint so that the solder will flow. This will allow you to "break" or open up the soldered joints. You'll have to do this on the corners of the zinc frame and the areas where the lead came is soldered to the zinc frame as well, remember to do both sides of your window. Carefully remove the zinc frame from the closest side to the broken piece of glass, you might have to remove two sides of zinc came.
Once removed, use your lead knife and cut into the closest soldered joints so that you will be able to open up the window to remove the broken piece of glass. You will have to cut both sides of the window, in the same spots. You might only have to cut up one area, but if the piece is large and you can't get into the broken piece, you will probably have to cut up into the window in two areas.


When you have cut both sides of lead came (only on the solder joints), front and back, up to the broken piece of glass, carefully remove or open up the window to where the broken piece is located. Once there carefully remove the broken piece of glass with needle nose pliers. Since the piece is cemented in place, it might take some work to pull the piece out. Use your lead knife to clean out the lead came surrounding the once broken piece of glass. If the lead came is damaged, you will then need to replace it.
Use the old piece of glass as a template to make a new paper pattern to replace the glass. Place the broken piece of glass on a piece of paper, trace around it with a pencil, and cut it out with regular scissors. Glue that piece of paper to the new replacement glass, cut, grind and its ready to replace.
If the piece of glass is too broken, or non existent, to use as a template to make the new piece of glass, use the rubbing you made of the original window to make the new paper pattern piece. We like to make a copy of that template first before doing anything else, just in case. Take one copy of the etching and with regular scissors, cut out the piece or pieces that needs to be replaced. When cutting, cut close to the center of the lead line that was traced in the original rubbing.
Once new pieces are cut and installed, re solder the once cut lead came joints. By doing it this way, it is impossible to tell that the window has been repaired! Then if the piece has a zinc frame, solder it back on before cementing.
Cement, clean and polish the window and it is now repaired!
To begin with you should tape together what is left of the broken piece of glass. If necessary make a rubbing of the window. Tape a piece of white paper on one side of the window, lightly rub the window with a crayon or charcoal so that you can see the shadow of the lead came lines.
Next, remove the frame. If you have a zinc came frame, you need to use a temperature controlled iron so that you can turn down the heat. Then with the temp turned down, heat up and actually carefully move the solder from the soldered areas on the zinc came frame, use paste flux on the joint so that the solder will flow. This will allow you to "break" or open up the soldered joints. You'll have to do this on the corners of the zinc frame and the areas where the lead came is soldered to the zinc frame as well, remember to do both sides of your window. Carefully remove the zinc frame from the closest side to the broken piece of glass, you might have to remove two sides of zinc came.
Once removed, use your lead knife and cut into the closest soldered joints so that you will be able to open up the window to remove the broken piece of glass. You will have to cut both sides of the window, in the same spots. You might only have to cut up one area, but if the piece is large and you can't get into the broken piece, you will probably have to cut up into the window in two areas.
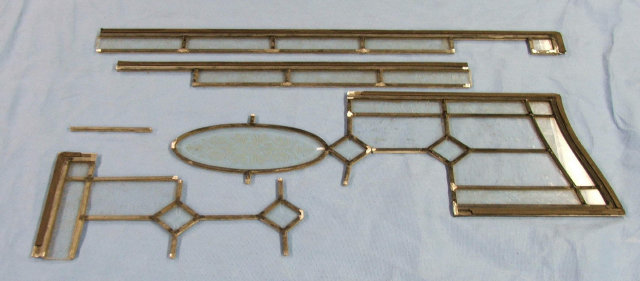


When you have cut both sides of lead came (only on the solder joints), front and back, up to the broken piece of glass, carefully remove or open up the window to where the broken piece is located. Once there carefully remove the broken piece of glass with needle nose pliers. Since the piece is cemented in place, it might take some work to pull the piece out. Use your lead knife to clean out the lead came surrounding the once broken piece of glass. If the lead came is damaged, you will then need to replace it.
Use the old piece of glass as a template to make a new paper pattern to replace the glass. Place the broken piece of glass on a piece of paper, trace around it with a pencil, and cut it out with regular scissors. Glue that piece of paper to the new replacement glass, cut, grind and its ready to replace.
If the piece of glass is too broken, or non existent, to use as a template to make the new piece of glass, use the rubbing you made of the original window to make the new paper pattern piece. We like to make a copy of that template first before doing anything else, just in case. Take one copy of the etching and with regular scissors, cut out the piece or pieces that needs to be replaced. When cutting, cut close to the center of the lead line that was traced in the original rubbing.
Once new pieces are cut and installed, re solder the once cut lead came joints. By doing it this way, it is impossible to tell that the window has been repaired! Then if the piece has a zinc frame, solder it back on before cementing.
Cement, clean and polish the window and it is now repaired!
Friday, August 26, 2011
What do you do with old lead came?
Occasionally you'll have unwanted lead came hanging around in your glass studio. You might have scraps left over from working on a new window or perhaps pieces from a repair job. Either way, eventually, if you use lead came, you'll end up with unwanted scrap came.
So how do you safely throw lead came away?
First of all, never throw it away in the trash like common garbage. Lead is considered a heavy metal. Lead, at certain exposure levels, is a poisonous substance to animals (that includes humans). It damages the nervous system and causes brain disorders. Excessive lead also causes blood disorders in mammals. Like the element mercury, another heavy metal, lead is a neurotoxin that accumulates both in soft tissues and the bones. Lead poisoning has been documented in ancient Rome, ancient Greece, and ancient China.
Typically, when lead came is thrown away in a local landfill, there is a great potential of causing a certain degree of lead poison leaching from the landfill and into the nearby ground and subsequently the groundwater and eventually the water supply.
The best way to get rid of unwanted lead came is to take it to a local recycle center that handles hazardous waste. Some states have hazardous waste centers where lead is accepted. Another way of disposing of lead came is to send it back to a lead came manufacturer so that they can recycle the lead back into new lead came! Which ever way you decide to use, it is our responsibility as glass artists to keep our craft from contaminating our environment!
Thursday, August 11, 2011
What happens if your piece of glass is thicker than your lead came?
Have you ever been working on a leaded glass window and discovered that you used such a thick piece of glass that it is too wide to fit into the channel of your lead came? This does happen! Typically this happens when you are using a piece of glass that has a very deep texture. You will notice that a piece of Drapery glass has a lot of very thick areas.
So, to resolve this problem, you will need to use wide heart came on that thick piece of glass. You don't need to use the wide heart came on the entire stained glass window, instead you can use it only around that thick piece of glass. And continue using the regular heart came for the remaining window. When shopping for came, it is possible to find wide heart came in lead, zinc and brass.
If this same situation arises when working with copper foil, the remedy is quite simple as well! You'll need to foil one side of the piece, then flip it over and foil the other side, allowing the foil to overlap in the center area of the edge of the piece of glass. Later, when the piece is soldered in the stained glass window or suncatcher, this piece will be as secure as a regularly foiled piece of glass!
So, to resolve this problem, you will need to use wide heart came on that thick piece of glass. You don't need to use the wide heart came on the entire stained glass window, instead you can use it only around that thick piece of glass. And continue using the regular heart came for the remaining window. When shopping for came, it is possible to find wide heart came in lead, zinc and brass.
If this same situation arises when working with copper foil, the remedy is quite simple as well! You'll need to foil one side of the piece, then flip it over and foil the other side, allowing the foil to overlap in the center area of the edge of the piece of glass. Later, when the piece is soldered in the stained glass window or suncatcher, this piece will be as secure as a regularly foiled piece of glass!
Thursday, July 21, 2011
How do you make a stained glass window fit a frame?
Often stained glass artists are not taught how to fit a stained glass pattern (or window) in to a specific sized frame. Typically artists will be asked to make a window that will fit into an existing frame for a friend or customer. Both the foil and leaded techniques use slightly different approaches to accomplishing this fairly simple goal. After reading our tutorial we hope you will feel much more confident in doing this!

To begin with, we will start with the foil method. Now, if you have a frame that doesn't have any glass in it, and you can easily move it around... place the frame on a piece of white paper on a hard surface (the piece of paper must be larger than the frame), the front side of the frame has to be facing you. Before doing so, prepare the frame by cleaning out any old caulk in the frame, if needed. The paper can be plain or it can have your pattern mostly drawn out on it. With a pencil, trace around the inside of your frame, where it touches the paper. Now you know the exact size of the interior of the frame you are using. You can now draw your stained glass window to fit in that frame!
Next we will discuss how to do this with a leaded window, or a foiled window with a zinc or lead came border. First follow all of the instructions for the foil method as listed above. Then measure the width of your lead came from the outer edge of the came to the interior side of the came where it touches the glass in your window. Ok, what that means is, looking at the drawing below, measure from the outer area that is marked 9/32" to the interior section that says 5/32". The area between the arrows, drawn below.
Once you get that measurement (it should only be a fraction of an inch), draw another new line completely around the inside of the first traced line, that will be the width of the measurement you just calculated. Use the first traced line as your reference. Now the area of your pattern will be slightly smaller than the original window opening, as to allow the width of the came you are using as a frame.
If you are using a frame like in a door or house window that you can't remove for this tracing process, measure the area where you intend to place the window. Once measured, we like to draw our pattern about 1/32 to 1/8 inch smaller than the opening. Keep in mind that if you are using a came border to follow our paragraph above.
We advise new stained glass artists to practice fitting a window into a frame before agreeing to do this for a customer.
Thursday, July 14, 2011
Don't forget to stretch lead came!
This post is for new glass artists learning how to use the lead came construction method. We included in our post a video link showing how to stretch the came with a lead vise. It is very important to stretch your came before using it in your window fabrication. The came actually becomes stronger when stretched, something not mentioned in the video but quite important to know! Click here to learn how to stretch lead came.
http://www.youtube.com/watch?v=X8otgjHvxuo
Below we found more valuable information from The Church Artist blog showing lead stretching.
http://www.youtube.com/watch?v=X8otgjHvxuo
Below we found more valuable information from The Church Artist blog showing lead stretching.
Step-by-step: working with lead
What holds all the glass pieces together in a stained glass window is extruded lead came, which is available in various sizes. Lead is a very soft metal, and to strengthen it, each came is placed in a lead vice like this, and then slightly stretched to harden it. This process is called "tempering" in the metal trades.


Here the artist pulls back on the lead, while bracing himself with the back foot in case the lead came disengages from the vice. More than a few apprentices have take a spill during this part of the glass project. It might be considered the second greatest occupational hazard of the industry, the first being bleeding fingers.


Here the artist pulls back on the lead, while bracing himself with the back foot in case the lead came disengages from the vice. More than a few apprentices have take a spill during this part of the glass project. It might be considered the second greatest occupational hazard of the industry, the first being bleeding fingers.
Tuesday, July 12, 2011
Foil vs Lead Came
Have you ever wondered how glass artists decide to use either foil or lead came for different stained glass pieces? There are actually advantages and disadvantages to using one or the other of these stained glass fabrication techniques. Basically, there are a few situations an artist should consider when deciding which method to use. Below we have compiled some information that we use in our own studio to decide which method to use on various stained glass art.
- what is the traditional method of fabrication for this type of design
- does this piece have a frame from which it will be hung
- is there a weight limitation
- does this piece contain a large number of little pieces
Of course we must add that there is really no right or wrong method when creating stained glass art! Also there are many artists that do not know how to work in both mediums.
The design aspect
Look at the style of the piece and decide what you typically see used in its fabrication. You will notice that beveled clusters and other beveled glass windows are usually leaded. Victorian, prairie style and other geometric designs also look good leaded. Landscapes and detailed scenes look nice foiled.
Suncatcher, or framed piece?
A suncatcher will last longer made with foil as opposed to lead came. Unfortunately lead came will stretch and ruin a suncatcher. If the suncatcher doesn't have a strong frame and will be hung from the lead came itself, the lead came will stretch and fall apart quickly. We prefer not to ever frame our pieces with lead came, instead we use zinc came for strength. Occasionally we frame a foiled suncatcher with lead came, but only if we do not intend to hang the piece directly from its lead came frame. Instead we solder the hanging hooks to an interior foiled soldered line instead.
Weight
Hanging a heavy lead came window can become problematic. It must be hung correctly from a window frame so as to handle the heavy load. A very heavy lead window placed in a door can also pose a problem later with the alignment of the door itself. In areas where weight can be an issue, we advise building a foiled window. Lead came lamps are heavy and the lead eventually stretches and ruins the lamp. Zinc came used in lamps works well but it's difficult to bend zinc so it works better for lamps with strait pieces of glass only. We prefer to build foiled lamps ie Tiffany lamps, which look more pleasing to the eye.
Amount of pieces in the window
Finally, while there are some very talented glass artists that can utilize lead came in windows that have many pieces, we suggest using foil for these projects. The thin foil lines used in a complicated piece seem to allow the actual image design to stand out as opposed to the heavier lead came (where the lead came might actually stand out more than the image itself). Also keep in mind that the more lead used in a window, meaning a window with a lot of pieces of glass, the heavier it will weigh when completed.
Monday, July 11, 2011
How to repair a leaded glass window

By Lynn Elliott
After an in-depth repair project, the leaded glass door fronting the author's built-in 1906 china cabinet looks good as new.
Looking at the missing panes and broken cames of the leaded glass doors fronting our 1906 built-in china cabinet, my husband, Todd, and I wondered how hard it would be to fix them ourselves. "Can novices repair leaded glass windows?" we asked each other. Like most old-house owners, we like the challenge of repairing our home's broken pieces—and our brick row house in Brooklyn, New York, has had plenty of parts in need of fixing. So I decided to look into the logistics of leaded glass.
After much research and some project trial and error, I found that repairing leaded glass is possible, but it's not easy. It's a daunting task that requires a high level of skill. You need to be comfortable working with both glass and some toxic materials—it's more than just the lead that's harmful—and it also helps if you have some soldering experience. In other words, repairing leaded glass is not for the faint of heart—but it can be done.
Step 1: Assess the Damage
Take stock of what you have to work with. Simpler patterns are easier to repair, while more complex designs—windows with a curved pattern, for example—require more dexterity. The leaded glass door on our cabinet had myriad problems: cracked glass, missing panes, broken lead came, and broken, bowing solder joints that were causing the remaining intact glass to loosen. We knew the damaged glass and came had to be completely replaced, but we tried to save as much of the old came (which has a lifespan of about 100 years) as we could.
Take stock of what you have to work with. Simpler patterns are easier to repair, while more complex designs—windows with a curved pattern, for example—require more dexterity. The leaded glass door on our cabinet had myriad problems: cracked glass, missing panes, broken lead came, and broken, bowing solder joints that were causing the remaining intact glass to loosen. We knew the damaged glass and came had to be completely replaced, but we tried to save as much of the old came (which has a lifespan of about 100 years) as we could.

Step 2: Prepare the Work Area and Materials
For the work surface, we laid a piece of 3/4 " plywood on a worktable and attached two furring strips (1 1./4 " x 2") at a 45-degree angle to help hold the window in place while we worked. Check that everything is squared before attaching the strips with screws. For glass-cutting, we kept a 2' section of low-pile carpet handy to work on to help prevent cracking the glass.
For the work surface, we laid a piece of 3/4 " plywood on a worktable and attached two furring strips (1 1./4 " x 2") at a 45-degree angle to help hold the window in place while we worked. Check that everything is squared before attaching the strips with screws. For glass-cutting, we kept a 2' section of low-pile carpet handy to work on to help prevent cracking the glass.

Next, you need to stretch the lead came to make it rigid enough for use. Put one end of the lead came into a vise attached to the worktable and grab the other with pliers or lead stretchers. (Tip: Cut the 6' lead strip in half so it's a manageable size.) Keep the came straight, and pull the lead so that it stretches about 1" to 1 1/2 ". Because lead came is soft and bends easily, support it with two hands when moving it. If the nubs are closed up, use a putty knife or a fid to open them. (Alternatively, you can buy stretched lead from a local supplier, as we did.)

Step 3: Liberate the Glass
Glass needs to be worked on a flat surface, so we removed the door from the china cabinet and took the window out of its frame. Working from the back side of the door, we gently pried the trim from the window with putty knives. Slip the putty knife between the trim and the frame, and use a gentle rocking motion to pry the trim loose. Next, pull out any remaining finish nails.
Glass needs to be worked on a flat surface, so we removed the door from the china cabinet and took the window out of its frame. Working from the back side of the door, we gently pried the trim from the window with putty knives. Slip the putty knife between the trim and the frame, and use a gentle rocking motion to pry the trim loose. Next, pull out any remaining finish nails.
We used the putty knives to loosen the window from the frame, then slid it out onto the work surface, laying it front side down. When working on a leaded glass repair, it's best to work on the front first because lead can slip through the joints when soldering, leaving unattractive solder joints on the back of the piece. But our piece was so fragile that we decided to work on the back first and clean up any unsightly joints on the front after the window was stable enough to turn.
Step 4: Make a Template
If you have a missing pane of glass, a template can help create a replacement piece, or it can be laid underneath the window on the worktable as a guide. To make the template, take a piece of paper large enough to cover your window and secure it atop the window with tape. Using a pencil, make a rubbing of the window's design. Be sure to capture all the details before removing the template from the window. You can trace over the lines with a marker to make them clearer. For intricate windows, number and mark each piece on the template to keep track of its correct location. Measure the length and the width of the window and record them on the template.
If you have a missing pane of glass, a template can help create a replacement piece, or it can be laid underneath the window on the worktable as a guide. To make the template, take a piece of paper large enough to cover your window and secure it atop the window with tape. Using a pencil, make a rubbing of the window's design. Be sure to capture all the details before removing the template from the window. You can trace over the lines with a marker to make them clearer. For intricate windows, number and mark each piece on the template to keep track of its correct location. Measure the length and the width of the window and record them on the template.

Step 5: Begin Repairs
Wearing safety glasses, we used a rotary tool with a 1" circular blade attachment to cut the lead joints along the left edge to access damaged areas. Cut only halfway through the joints, and be careful not to cut adjacent glass. After completing one side, flip the window to do the other side. Because our window was so brittle, we slid it slightly off the edge of the worktable, keeping the glass supported while hanging just the edge over the side, and made the cuts from underneath. (If you try this method, make sure you have a helper.) Another option is to cut a piece of plywood to fit over the window and plywood base, creating a "sandwich" that can be turned over.
Wearing safety glasses, we used a rotary tool with a 1" circular blade attachment to cut the lead joints along the left edge to access damaged areas. Cut only halfway through the joints, and be careful not to cut adjacent glass. After completing one side, flip the window to do the other side. Because our window was so brittle, we slid it slightly off the edge of the worktable, keeping the glass supported while hanging just the edge over the side, and made the cuts from underneath. (If you try this method, make sure you have a helper.) Another option is to cut a piece of plywood to fit over the window and plywood base, creating a "sandwich" that can be turned over.

We began assembling the bowed areas—where joints were cracking and the glass was loosening from the cames—trying to save the old leadwork where we could. We cleaned out the cames with putty knives and box cutters, then tried fitting the loose glass back in the cames. Next we gently tapped the old lead came and glass back into place using the hammer and the wood handle of the putty knife or a small piece of scrap lead (hitting directly with a hammer can cause the glass to crack) and secured it with German glazing nails. The glazing nails should be lightly tapped into place so you can still move them easily.
Step 6: Cut the Glass
When cutting replacement panes, we were lucky enough to have an intact original pane to use as a template. (If you don't have an intact piece, you can use the paper template as a guide.) Using a black marker, outline the template on the glass, then remove it. Next, score the glass with the glass cutter. Make sure to score inside the black lines; otherwise your replacement will be too big.
Hold the glass cutter between your middle and index finger, fitting it snugly against the joint between the two, and grasp the bottom with your index finger and thumb. Keep glass-cutter oil ready in a shallow bowl, and dip the cutter each time you score the glass. For straight scoring, butt the glass cutter against a ruler. Keep the cutter upright, and press firmly but not too hard, moving in a steady motion down the entire sheet. Practice on scrap glass first to perfect your technique.
When cutting replacement panes, we were lucky enough to have an intact original pane to use as a template. (If you don't have an intact piece, you can use the paper template as a guide.) Using a black marker, outline the template on the glass, then remove it. Next, score the glass with the glass cutter. Make sure to score inside the black lines; otherwise your replacement will be too big.
Hold the glass cutter between your middle and index finger, fitting it snugly against the joint between the two, and grasp the bottom with your index finger and thumb. Keep glass-cutter oil ready in a shallow bowl, and dip the cutter each time you score the glass. For straight scoring, butt the glass cutter against a ruler. Keep the cutter upright, and press firmly but not too hard, moving in a steady motion down the entire sheet. Practice on scrap glass first to perfect your technique.

There are two ways to break scored glass. The first is to use breaker pliers, which I found easier as a beginner. Line the white line on the pliers up on your scored line and press down to snap the glass in a straight line. You also can slide the scored portion off the worktable's edge and use the rounded head of the glass cutter to tap along the scored line, then grasp the edge with your free hand and press down until the glass snaps in a straight line. Once you've created replacement panes, check the fit in the window by either comparing the panes against the template or against the remaining lead cames.

Step 7: Cut and Solder the Lead
Next, cut the lead came to fit. As beginners, lead nippers were our tool of choice (professionals use a lead knife). The flat side of the nippers makes a straight cut; the concave side a mitered one. Place a length of came where you need a new section. With the nippers, nick the spot where you want to make a cut—it should be slightly beyond the end of the glass to leave room for soldering—then tap the lead into place with glazing nails.
Next, cut the lead came to fit. As beginners, lead nippers were our tool of choice (professionals use a lead knife). The flat side of the nippers makes a straight cut; the concave side a mitered one. Place a length of came where you need a new section. With the nippers, nick the spot where you want to make a cut—it should be slightly beyond the end of the glass to leave room for soldering—then tap the lead into place with glazing nails.

To effectively solder old lead joints, you must expose fresh lead, either by scraping the joints with a box cutter or by using the rotary tool with a wire brush, which tends to go much faster. Whatever the method, always wear a face mask for this work, as it creates a lot of dust and scraps. Clean up afterward with a shop vacuum.

Next, brush flux on all joints to be soldered (flux helps solder flow freely and adhere) and on the tip of the hot soldering iron, then clean the tip on a wet sponge (you should see water when you press on it). Glass cutter cleaners—sponges in a hard plastic case—aren't very expensive, but you also can substitute an ordinary sponge in an appropriate container.
Place the solder near the joint and melt it with the iron. Don't use too much solder, and don't extend it past the joint. In a circular motion, move the iron across the joint, smoothing the solder into and across the joint. Don't leave the iron on the joint for more than two or three seconds, or you risk melting the came. You may get solder drips on the glass, but they should easily slide or scrape off or with light scraping.

Check the joint—if you're unhappy with the soldering, let it cool and then work on it again, bearing in mind that the came can melt. When you're done, wipe down the window with paper towels and glass cleaner, then turn the window over and repeat the soldering process.

Step 8: Cement the Window
The last step is cementing the panes in place with putty and whiting. Glazing putty has a shelf life—it should be moist with some oil showing on top. If your putty gets too hard, add a touch of linseed oil to soften it up, but don't overdo it—putty should be firm, not runny.
The last step is cementing the panes in place with putty and whiting. Glazing putty has a shelf life—it should be moist with some oil showing on top. If your putty gets too hard, add a touch of linseed oil to soften it up, but don't overdo it—putty should be firm, not runny.
Wearing latex gloves, take a ball-size portion of the putty and knead it for a minute or two. The putty will soften as you work it—some lumps are normal, but most smooth out. You can add a light sprinkling of whiting to the putty for strengthening, but we preferred the putty alone because too much whiting can dry out the putty.
Secure the panel with glazing nails, then take some putty and press it into the cames to fill spaces between the glass and the lead came. Don't put too much pressure on the window—you don't want to crack the glass. Some putty may leak through to the other side. Once you've completed the panel, clean around the seams with an awl or a fid, and remove excess putty with a little roll of the putty itself or a natural-bristle brush.
Secure the panel with glazing nails, then take some putty and press it into the cames to fill spaces between the glass and the lead came. Don't put too much pressure on the window—you don't want to crack the glass. Some putty may leak through to the other side. Once you've completed the panel, clean around the seams with an awl or a fid, and remove excess putty with a little roll of the putty itself or a natural-bristle brush.

Whether or not you used whiting during kneading, you'll need to sprinkle some over the window at this point. Wear a face mask and sprinkle the whiting gently; try not to create a cloud of whiting dust. Next, gently spread the whiting around by moving a natural-bristle brush in a circular motion along the cames. The linseed oil should start drying up, and the lead will start to oxidize (turn darker), which is your cue to vacuum up the whiting. If there is residual oil, repeat the process with a second coating of whiting.

Take your natural-bristle brush and sweep the lead to create a dark patina. Doing this by hand can be tedious and labor-intensive, but we liked the results. A faster method mounts a bristle brush attachment on a drill. It's a good idea to break the brush in on the edge of the worktable first so bristles polish the lead instead of scratching it.
With the patina ready, we returned the window back its door frame and reattached the trim, giving our 1906 china cabinet a new lease on life.
With the patina ready, we returned the window back its door frame and reattached the trim, giving our 1906 china cabinet a new lease on life.

Former OHJ staffer Lynn Elliott is a copy editor for Random House Children's Books and has written numerous articles on repairing and decorating old houses.
Thursday, June 30, 2011
Videos showing a larger stained glass studio in operation!
We found this set of videos yesterday from a stained glass business, Stained Glass Resources Inc, doing restoration on a broken leaded glass window. It gives you an excellent idea of what a large stained glass studio, with multiple work areas in use, actually looks like!
This is a multi part series on the restoration and repair of a Tiffany stained glass window in the Historic Calvary United Methodist Church, in Pittsburgh, Pennsylvania. This restoration work was done by the skilled artisans at Stained Glass Resources Inc. They have received awards for the work that was done to restore the Tiffany stained glass window at Calvary United Methodist Church.
Be sure to check out all of their videos, they are extremely interesting and informative!
Click here to see http://www.youtube.com/watch?v=96I8BWtoBAk
This is a multi part series on the restoration and repair of a Tiffany stained glass window in the Historic Calvary United Methodist Church, in Pittsburgh, Pennsylvania. This restoration work was done by the skilled artisans at Stained Glass Resources Inc. They have received awards for the work that was done to restore the Tiffany stained glass window at Calvary United Methodist Church.
Be sure to check out all of their videos, they are extremely interesting and informative!
Click here to see http://www.youtube.com/watch?v=96I8BWtoBAk
Wednesday, June 8, 2011
Putty recipe for cementing leaded glass windows
Did you know that you can make your own putty for cementing your leaded glass windows? Now you won't have to keep buying those little (and usually sort of dried out) pre-made putty containers at your local glass supplier since this recipe, my personal recipe, that I am sharing with you allows you to continually make any amount of fresh putty. It stores well too.
Materials needed:
Plastic bucket
Wooden paint stir stick
Whiting
Japan drier
Linseed oil
Turpentine
I like to use a plastic bucket that has a lid that can seal well. The buckets you get at your local home improvement store are excellent. I use a paint stir stick to mix the ingredients.
In your plastic bucket add the whiting first. Do this in a well ventilated area since the whiting is very fine powder. Add linseed oil to the whiting and stir with the wooden paint stir stick so that the whiting is no longer powdery. I like to add enough linseed oil to the whiting so that it has the consistency of thick putty. I then add Japan drier to this mixture, sparingly. I use much more linseed oil than Japan drier when I mix up my putty. If the putty seems too liquidy, add more whiting to thicken it up.
When I have finished cementing, I put all of my excess putty back into my plastic bucket-(with whatever I haven't used) and stir everything together. I also put the excess whiting that I used when doing my final stage of cementing my window back into the plastic bucket. When you do this a couple of times you will notice that your putty will turn a nice silvery- black color. Occasionally I will add a little turpentine into my bucket to thin out my putty mixture, but I only use a tiny amount of turpentine, since turpentine will eventually eat through a plastic bucket.
When finished, I also use turpentine to clean everything up.
Any time you need more putty, add whiting and the other ingredients into the bucket that already contains the previously mixed putty.
REMEMBER to seal your plastic bucket so that your putty doesn't dry out!
Materials needed:
Plastic bucket
Wooden paint stir stick
Whiting
Japan drier
Linseed oil
Turpentine
I like to use a plastic bucket that has a lid that can seal well. The buckets you get at your local home improvement store are excellent. I use a paint stir stick to mix the ingredients.
In your plastic bucket add the whiting first. Do this in a well ventilated area since the whiting is very fine powder. Add linseed oil to the whiting and stir with the wooden paint stir stick so that the whiting is no longer powdery. I like to add enough linseed oil to the whiting so that it has the consistency of thick putty. I then add Japan drier to this mixture, sparingly. I use much more linseed oil than Japan drier when I mix up my putty. If the putty seems too liquidy, add more whiting to thicken it up.
When I have finished cementing, I put all of my excess putty back into my plastic bucket-(with whatever I haven't used) and stir everything together. I also put the excess whiting that I used when doing my final stage of cementing my window back into the plastic bucket. When you do this a couple of times you will notice that your putty will turn a nice silvery- black color. Occasionally I will add a little turpentine into my bucket to thin out my putty mixture, but I only use a tiny amount of turpentine, since turpentine will eventually eat through a plastic bucket.
When finished, I also use turpentine to clean everything up.
Any time you need more putty, add whiting and the other ingredients into the bucket that already contains the previously mixed putty.
REMEMBER to seal your plastic bucket so that your putty doesn't dry out!
Subscribe to:
Posts (Atom)
Subscribe To The Blog


 Posts
All Comments
Posts
All Comments





