














I read this somewhere on the internet in the past but couldn't find the information again. So what I know is that when using flux on or near a piece of glass that has been hand painted and fired, stay away from flux that is only made of muriatic acid. That type of acid will make make some painted glass haze.
It is best to research what ingredients are used in your flux. The common soldering fluxes, which contain acid, usually contain zinc chloride and/or ammonium chloride. They may also contain some free hydrochloric acid. Killed acid, is just muriatic acid to which zinc metal has been dissolved in, to produce a solution of zinc chloride.
Showing posts with label flux. Show all posts
Showing posts with label flux. Show all posts
Monday, September 17, 2012


Wednesday, August 15, 2012
Soldering problems and tips, chart
| PROBLEM | PROBABLE CAUSE |
|---|---|
| Solder falls through seams to other side when soldering copper foiled pieces. | Soldering iron is too hot or you are holding the iron in one area too long. Put a damp rag or sponge under the area you are soldering. |
| Beading of seams is too flat. | Not enough solder. |
| Beading is lumpy -- peaks instead of flowing. | Iron is too cold. |
| Can't seam to get beading smooth. | Wrong kind of solder for job. Did you flux? Iron too cold or too hot. Too much or not enough solder. |
| Solder won't stick to copper foil or lead. | Did you flux? Copper foil may be oxidized; clean with vinegar, salt, and water solution. Lead may be oxidized; wipe clean, dry, and rub with fine steel wool or wire brush. |
| Solder splatters into little balls all over the glass. | Iron too hot; purchase rheostat for your iron. This will control the current to your iron and control the heat output. |
| Lead came melts and disappears before your eyes. | Directly touching the lead came with a very hot iron. Position solder at joint, iron on top. Let solder flow down on lead came. |
Tuesday, October 25, 2011
Soldering tips from a pro
When we teach beginning stained glass classes we notice that quite a few of our students have issues and questions with soldering. It is only natural! It can be quite a daunting task for a student who has never soldered before. I have come to the conclusion that there are two groups of new stained glass solderers, ones that get it right away and others that need to practice, practice, practice. So today I thought I'd try to explain to new stained glass artists how to solder properly!
To begin with, you will need the correct foil, solder, flux and soldering iron. In fact, you will also need a good work surface as well. We solder our windows on top of a sheet of particle board which we lay on top of our work bench. We prefer not to solder directly on top of our bench since flux will flow into and onto the work surface you will use. Not to mention that you can scorch the surface you are soldering on. We want to keep our work surface clean for making patterns, cutting our glass etc etc, for that reason we keep our table top flux free!
As far as using the correct foil, what we mean by that is, using clean foil. That means foil that doesn't have the backing glue on the outer copper surface or contaminated with other materials. If the foil is contaminated carefully clean it with either rubbing alcohol or Goof-Off. When foiling you need to foil the pieces with equal foil on the front and back side of the piece of glass. The foil needs to be flattened down with a fid (a flat plastic stick or even a pencil) to make a nice smooth surface for soldering. If the foiling is flawed or sloppy, the solder job will also look flawed since you can't add additional solder to an area that doesn't already have foil. So take your time when foiling and do a good job, or it will show later. When soldering lead came, the came needs to be clean too.
For solder we prefer to use 50/50 solder for lead came and 60/40 for copper foil.
With flux we like to use paste flux for lead came and liquid flux on copper foil. There are types of flux that seem to sputter when heated. We try to stay away from those brands of flux. They can actually become dangerous by allowing small particles of molten solder to become air born and perhaps land on skin or clothing.
We advise glass artists to use soldering irons made for stained glass. Some irons used for circuit boards do not heat up enough to work properly. Other irons only have small iron tips which can make it very difficult to solder easily.
Once all of the above conditions are met, it is time to start soldering. We start soldering on the front side of the window, once completed we flip the window over, solder the back side completely, then flip the window over to repair the front where solder may have flowed from the back to the front. We flip the window back and forth until we are happy with the soldering. If the window is to have a zinc frame, we solder it on at this time, as well.
On the front side of the window, when we begin to solder a piece, we like to tack solder all of our glass pieces into place. By that I mean, we like to put a little solder on every piece just to keep all pieces from moving and distorting the window's shape, as we solder. We do butt our window up to the outer area of our work surface where we nailed two strips of wood trim into a 90 degree angle (we do this to keep our window square). As seen in the picture below.

To begin with, you will need the correct foil, solder, flux and soldering iron. In fact, you will also need a good work surface as well. We solder our windows on top of a sheet of particle board which we lay on top of our work bench. We prefer not to solder directly on top of our bench since flux will flow into and onto the work surface you will use. Not to mention that you can scorch the surface you are soldering on. We want to keep our work surface clean for making patterns, cutting our glass etc etc, for that reason we keep our table top flux free!
As far as using the correct foil, what we mean by that is, using clean foil. That means foil that doesn't have the backing glue on the outer copper surface or contaminated with other materials. If the foil is contaminated carefully clean it with either rubbing alcohol or Goof-Off. When foiling you need to foil the pieces with equal foil on the front and back side of the piece of glass. The foil needs to be flattened down with a fid (a flat plastic stick or even a pencil) to make a nice smooth surface for soldering. If the foiling is flawed or sloppy, the solder job will also look flawed since you can't add additional solder to an area that doesn't already have foil. So take your time when foiling and do a good job, or it will show later. When soldering lead came, the came needs to be clean too.
For solder we prefer to use 50/50 solder for lead came and 60/40 for copper foil.
With flux we like to use paste flux for lead came and liquid flux on copper foil. There are types of flux that seem to sputter when heated. We try to stay away from those brands of flux. They can actually become dangerous by allowing small particles of molten solder to become air born and perhaps land on skin or clothing.
We advise glass artists to use soldering irons made for stained glass. Some irons used for circuit boards do not heat up enough to work properly. Other irons only have small iron tips which can make it very difficult to solder easily.
Once all of the above conditions are met, it is time to start soldering. We start soldering on the front side of the window, once completed we flip the window over, solder the back side completely, then flip the window over to repair the front where solder may have flowed from the back to the front. We flip the window back and forth until we are happy with the soldering. If the window is to have a zinc frame, we solder it on at this time, as well.
On the front side of the window, when we begin to solder a piece, we like to tack solder all of our glass pieces into place. By that I mean, we like to put a little solder on every piece just to keep all pieces from moving and distorting the window's shape, as we solder. We do butt our window up to the outer area of our work surface where we nailed two strips of wood trim into a 90 degree angle (we do this to keep our window square). As seen in the picture below.

Photo from the Colson Stained Glass Studio
First apply the flux to the entire piece. We use a small paint brush which can be purchased at most stained glass retailers. When soldering you want the solder line to look rounded, not flat. If an area looks flat, add more solder so that the solder line is rounded! It is not necessary to solder in any specific manner, it is more important to have the correct finished look. If you end up with rough, dull colored soldered areas, that is indicative of cold solder. To repair an area like that, add a little more flux to the area and heat up the area with your soldering iron. You also don't want excessive blemishes and large clumps of solder. To repair, re-flux and re-solder. It is not necessary to always add more solder, it is possible to just heat the offending area with your iron and correct the issue.
When done soldering, both sides, wash off the flux. Flux can eventually deteriorate the solder if left on the window. We clean the flux off our windows by using a sponge with a small amount of dish detergent.
Finally, please watch the soldering video we previously posted SOLDERING COPPER FOIL. There are other soldering videos on You Tube and online which are excellent to watch and give hints and tips to new glass artists.
Monday, October 24, 2011
Soldering copper foil video
We found this very good video on YouTube by DelphiGlass teaching how to solder copper foil. Click on this link to watch the Soldering copper foil video here. It is excellent for new glass artists and others who have problems soldering correctly. Soldering video link
Monday, September 19, 2011
Soldering irons for glass art
Again, we always recommend that our students purchase a soldering iron specifically made for stained glass. There are irons made for soldering pc boards that really won't work well for soldering foil or lead came.
Also when soldering lead came our studio glass artisans at Harrach Stained Glass always use temperature controlled irons or we plug our irons into a Mini Phaser which is pictured below. Just plug an iron into the Mini Phaser and control the iron's temperature by using the dial on the front of the unit.

We have found that a lot of glass artists prefer to use 60/40 solder for all of their soldering needs. At our studio we use 60/40 solder on copper foil and 50/50 on lead came. We also prefer paste flux for lead came and liquid flux for copper foil.
It is also important to always use an iron stand, to allow the iron to be easily laid down while still hot or plugged in, without burning a work surface!

There are quite a few different wattage irons available, such as 40w, 50w, 60w, 80w, 100w and 175 watts. Some irons have ceramic heating elements, which are supposed to last longer than non ceramic elements.
Weller

Hakko

Inland

Also when soldering lead came our studio glass artisans at Harrach Stained Glass always use temperature controlled irons or we plug our irons into a Mini Phaser which is pictured below. Just plug an iron into the Mini Phaser and control the iron's temperature by using the dial on the front of the unit.

We have found that a lot of glass artists prefer to use 60/40 solder for all of their soldering needs. At our studio we use 60/40 solder on copper foil and 50/50 on lead came. We also prefer paste flux for lead came and liquid flux for copper foil.
It is also important to always use an iron stand, to allow the iron to be easily laid down while still hot or plugged in, without burning a work surface!

There are quite a few different wattage irons available, such as 40w, 50w, 60w, 80w, 100w and 175 watts. Some irons have ceramic heating elements, which are supposed to last longer than non ceramic elements.
Weller

Hakko

Inland

Tuesday, September 6, 2011
How to repair a broken piece in a leaded glass window.
Occasionally a glass artist will be asked if they can repair a broken leaded glass window but are not sure how to go about repairing the piece. I think that repairing a leaded glass window is much easier than repairing a copper foiled window.
To begin with you should tape together what is left of the broken piece of glass. If necessary make a rubbing of the window. Tape a piece of white paper on one side of the window, lightly rub the window with a crayon or charcoal so that you can see the shadow of the lead came lines.
Next, remove the frame. If you have a zinc came frame, you need to use a temperature controlled iron so that you can turn down the heat. Then with the temp turned down, heat up and actually carefully move the solder from the soldered areas on the zinc came frame, use paste flux on the joint so that the solder will flow. This will allow you to "break" or open up the soldered joints. You'll have to do this on the corners of the zinc frame and the areas where the lead came is soldered to the zinc frame as well, remember to do both sides of your window. Carefully remove the zinc frame from the closest side to the broken piece of glass, you might have to remove two sides of zinc came.
Once removed, use your lead knife and cut into the closest soldered joints so that you will be able to open up the window to remove the broken piece of glass. You will have to cut both sides of the window, in the same spots. You might only have to cut up one area, but if the piece is large and you can't get into the broken piece, you will probably have to cut up into the window in two areas.


When you have cut both sides of lead came (only on the solder joints), front and back, up to the broken piece of glass, carefully remove or open up the window to where the broken piece is located. Once there carefully remove the broken piece of glass with needle nose pliers. Since the piece is cemented in place, it might take some work to pull the piece out. Use your lead knife to clean out the lead came surrounding the once broken piece of glass. If the lead came is damaged, you will then need to replace it.
Use the old piece of glass as a template to make a new paper pattern to replace the glass. Place the broken piece of glass on a piece of paper, trace around it with a pencil, and cut it out with regular scissors. Glue that piece of paper to the new replacement glass, cut, grind and its ready to replace.
If the piece of glass is too broken, or non existent, to use as a template to make the new piece of glass, use the rubbing you made of the original window to make the new paper pattern piece. We like to make a copy of that template first before doing anything else, just in case. Take one copy of the etching and with regular scissors, cut out the piece or pieces that needs to be replaced. When cutting, cut close to the center of the lead line that was traced in the original rubbing.
Once new pieces are cut and installed, re solder the once cut lead came joints. By doing it this way, it is impossible to tell that the window has been repaired! Then if the piece has a zinc frame, solder it back on before cementing.
Cement, clean and polish the window and it is now repaired!
To begin with you should tape together what is left of the broken piece of glass. If necessary make a rubbing of the window. Tape a piece of white paper on one side of the window, lightly rub the window with a crayon or charcoal so that you can see the shadow of the lead came lines.
Next, remove the frame. If you have a zinc came frame, you need to use a temperature controlled iron so that you can turn down the heat. Then with the temp turned down, heat up and actually carefully move the solder from the soldered areas on the zinc came frame, use paste flux on the joint so that the solder will flow. This will allow you to "break" or open up the soldered joints. You'll have to do this on the corners of the zinc frame and the areas where the lead came is soldered to the zinc frame as well, remember to do both sides of your window. Carefully remove the zinc frame from the closest side to the broken piece of glass, you might have to remove two sides of zinc came.
Once removed, use your lead knife and cut into the closest soldered joints so that you will be able to open up the window to remove the broken piece of glass. You will have to cut both sides of the window, in the same spots. You might only have to cut up one area, but if the piece is large and you can't get into the broken piece, you will probably have to cut up into the window in two areas.
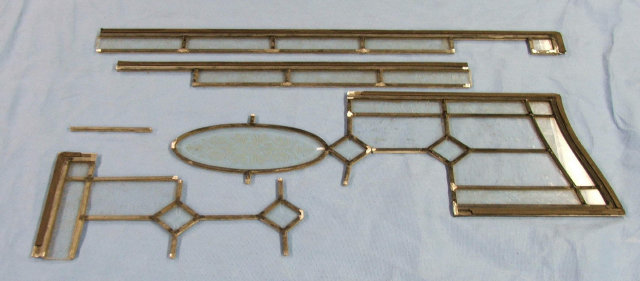


When you have cut both sides of lead came (only on the solder joints), front and back, up to the broken piece of glass, carefully remove or open up the window to where the broken piece is located. Once there carefully remove the broken piece of glass with needle nose pliers. Since the piece is cemented in place, it might take some work to pull the piece out. Use your lead knife to clean out the lead came surrounding the once broken piece of glass. If the lead came is damaged, you will then need to replace it.
Use the old piece of glass as a template to make a new paper pattern to replace the glass. Place the broken piece of glass on a piece of paper, trace around it with a pencil, and cut it out with regular scissors. Glue that piece of paper to the new replacement glass, cut, grind and its ready to replace.
If the piece of glass is too broken, or non existent, to use as a template to make the new piece of glass, use the rubbing you made of the original window to make the new paper pattern piece. We like to make a copy of that template first before doing anything else, just in case. Take one copy of the etching and with regular scissors, cut out the piece or pieces that needs to be replaced. When cutting, cut close to the center of the lead line that was traced in the original rubbing.
Once new pieces are cut and installed, re solder the once cut lead came joints. By doing it this way, it is impossible to tell that the window has been repaired! Then if the piece has a zinc frame, solder it back on before cementing.
Cement, clean and polish the window and it is now repaired!
Monday, July 11, 2011
How to repair a leaded glass window

By Lynn Elliott
After an in-depth repair project, the leaded glass door fronting the author's built-in 1906 china cabinet looks good as new.
Looking at the missing panes and broken cames of the leaded glass doors fronting our 1906 built-in china cabinet, my husband, Todd, and I wondered how hard it would be to fix them ourselves. "Can novices repair leaded glass windows?" we asked each other. Like most old-house owners, we like the challenge of repairing our home's broken pieces—and our brick row house in Brooklyn, New York, has had plenty of parts in need of fixing. So I decided to look into the logistics of leaded glass.
After much research and some project trial and error, I found that repairing leaded glass is possible, but it's not easy. It's a daunting task that requires a high level of skill. You need to be comfortable working with both glass and some toxic materials—it's more than just the lead that's harmful—and it also helps if you have some soldering experience. In other words, repairing leaded glass is not for the faint of heart—but it can be done.
Step 1: Assess the Damage
Take stock of what you have to work with. Simpler patterns are easier to repair, while more complex designs—windows with a curved pattern, for example—require more dexterity. The leaded glass door on our cabinet had myriad problems: cracked glass, missing panes, broken lead came, and broken, bowing solder joints that were causing the remaining intact glass to loosen. We knew the damaged glass and came had to be completely replaced, but we tried to save as much of the old came (which has a lifespan of about 100 years) as we could.
Take stock of what you have to work with. Simpler patterns are easier to repair, while more complex designs—windows with a curved pattern, for example—require more dexterity. The leaded glass door on our cabinet had myriad problems: cracked glass, missing panes, broken lead came, and broken, bowing solder joints that were causing the remaining intact glass to loosen. We knew the damaged glass and came had to be completely replaced, but we tried to save as much of the old came (which has a lifespan of about 100 years) as we could.

Step 2: Prepare the Work Area and Materials
For the work surface, we laid a piece of 3/4 " plywood on a worktable and attached two furring strips (1 1./4 " x 2") at a 45-degree angle to help hold the window in place while we worked. Check that everything is squared before attaching the strips with screws. For glass-cutting, we kept a 2' section of low-pile carpet handy to work on to help prevent cracking the glass.
For the work surface, we laid a piece of 3/4 " plywood on a worktable and attached two furring strips (1 1./4 " x 2") at a 45-degree angle to help hold the window in place while we worked. Check that everything is squared before attaching the strips with screws. For glass-cutting, we kept a 2' section of low-pile carpet handy to work on to help prevent cracking the glass.

Next, you need to stretch the lead came to make it rigid enough for use. Put one end of the lead came into a vise attached to the worktable and grab the other with pliers or lead stretchers. (Tip: Cut the 6' lead strip in half so it's a manageable size.) Keep the came straight, and pull the lead so that it stretches about 1" to 1 1/2 ". Because lead came is soft and bends easily, support it with two hands when moving it. If the nubs are closed up, use a putty knife or a fid to open them. (Alternatively, you can buy stretched lead from a local supplier, as we did.)

Step 3: Liberate the Glass
Glass needs to be worked on a flat surface, so we removed the door from the china cabinet and took the window out of its frame. Working from the back side of the door, we gently pried the trim from the window with putty knives. Slip the putty knife between the trim and the frame, and use a gentle rocking motion to pry the trim loose. Next, pull out any remaining finish nails.
Glass needs to be worked on a flat surface, so we removed the door from the china cabinet and took the window out of its frame. Working from the back side of the door, we gently pried the trim from the window with putty knives. Slip the putty knife between the trim and the frame, and use a gentle rocking motion to pry the trim loose. Next, pull out any remaining finish nails.
We used the putty knives to loosen the window from the frame, then slid it out onto the work surface, laying it front side down. When working on a leaded glass repair, it's best to work on the front first because lead can slip through the joints when soldering, leaving unattractive solder joints on the back of the piece. But our piece was so fragile that we decided to work on the back first and clean up any unsightly joints on the front after the window was stable enough to turn.
Step 4: Make a Template
If you have a missing pane of glass, a template can help create a replacement piece, or it can be laid underneath the window on the worktable as a guide. To make the template, take a piece of paper large enough to cover your window and secure it atop the window with tape. Using a pencil, make a rubbing of the window's design. Be sure to capture all the details before removing the template from the window. You can trace over the lines with a marker to make them clearer. For intricate windows, number and mark each piece on the template to keep track of its correct location. Measure the length and the width of the window and record them on the template.
If you have a missing pane of glass, a template can help create a replacement piece, or it can be laid underneath the window on the worktable as a guide. To make the template, take a piece of paper large enough to cover your window and secure it atop the window with tape. Using a pencil, make a rubbing of the window's design. Be sure to capture all the details before removing the template from the window. You can trace over the lines with a marker to make them clearer. For intricate windows, number and mark each piece on the template to keep track of its correct location. Measure the length and the width of the window and record them on the template.

Step 5: Begin Repairs
Wearing safety glasses, we used a rotary tool with a 1" circular blade attachment to cut the lead joints along the left edge to access damaged areas. Cut only halfway through the joints, and be careful not to cut adjacent glass. After completing one side, flip the window to do the other side. Because our window was so brittle, we slid it slightly off the edge of the worktable, keeping the glass supported while hanging just the edge over the side, and made the cuts from underneath. (If you try this method, make sure you have a helper.) Another option is to cut a piece of plywood to fit over the window and plywood base, creating a "sandwich" that can be turned over.
Wearing safety glasses, we used a rotary tool with a 1" circular blade attachment to cut the lead joints along the left edge to access damaged areas. Cut only halfway through the joints, and be careful not to cut adjacent glass. After completing one side, flip the window to do the other side. Because our window was so brittle, we slid it slightly off the edge of the worktable, keeping the glass supported while hanging just the edge over the side, and made the cuts from underneath. (If you try this method, make sure you have a helper.) Another option is to cut a piece of plywood to fit over the window and plywood base, creating a "sandwich" that can be turned over.

We began assembling the bowed areas—where joints were cracking and the glass was loosening from the cames—trying to save the old leadwork where we could. We cleaned out the cames with putty knives and box cutters, then tried fitting the loose glass back in the cames. Next we gently tapped the old lead came and glass back into place using the hammer and the wood handle of the putty knife or a small piece of scrap lead (hitting directly with a hammer can cause the glass to crack) and secured it with German glazing nails. The glazing nails should be lightly tapped into place so you can still move them easily.
Step 6: Cut the Glass
When cutting replacement panes, we were lucky enough to have an intact original pane to use as a template. (If you don't have an intact piece, you can use the paper template as a guide.) Using a black marker, outline the template on the glass, then remove it. Next, score the glass with the glass cutter. Make sure to score inside the black lines; otherwise your replacement will be too big.
Hold the glass cutter between your middle and index finger, fitting it snugly against the joint between the two, and grasp the bottom with your index finger and thumb. Keep glass-cutter oil ready in a shallow bowl, and dip the cutter each time you score the glass. For straight scoring, butt the glass cutter against a ruler. Keep the cutter upright, and press firmly but not too hard, moving in a steady motion down the entire sheet. Practice on scrap glass first to perfect your technique.
When cutting replacement panes, we were lucky enough to have an intact original pane to use as a template. (If you don't have an intact piece, you can use the paper template as a guide.) Using a black marker, outline the template on the glass, then remove it. Next, score the glass with the glass cutter. Make sure to score inside the black lines; otherwise your replacement will be too big.
Hold the glass cutter between your middle and index finger, fitting it snugly against the joint between the two, and grasp the bottom with your index finger and thumb. Keep glass-cutter oil ready in a shallow bowl, and dip the cutter each time you score the glass. For straight scoring, butt the glass cutter against a ruler. Keep the cutter upright, and press firmly but not too hard, moving in a steady motion down the entire sheet. Practice on scrap glass first to perfect your technique.

There are two ways to break scored glass. The first is to use breaker pliers, which I found easier as a beginner. Line the white line on the pliers up on your scored line and press down to snap the glass in a straight line. You also can slide the scored portion off the worktable's edge and use the rounded head of the glass cutter to tap along the scored line, then grasp the edge with your free hand and press down until the glass snaps in a straight line. Once you've created replacement panes, check the fit in the window by either comparing the panes against the template or against the remaining lead cames.

Step 7: Cut and Solder the Lead
Next, cut the lead came to fit. As beginners, lead nippers were our tool of choice (professionals use a lead knife). The flat side of the nippers makes a straight cut; the concave side a mitered one. Place a length of came where you need a new section. With the nippers, nick the spot where you want to make a cut—it should be slightly beyond the end of the glass to leave room for soldering—then tap the lead into place with glazing nails.
Next, cut the lead came to fit. As beginners, lead nippers were our tool of choice (professionals use a lead knife). The flat side of the nippers makes a straight cut; the concave side a mitered one. Place a length of came where you need a new section. With the nippers, nick the spot where you want to make a cut—it should be slightly beyond the end of the glass to leave room for soldering—then tap the lead into place with glazing nails.

To effectively solder old lead joints, you must expose fresh lead, either by scraping the joints with a box cutter or by using the rotary tool with a wire brush, which tends to go much faster. Whatever the method, always wear a face mask for this work, as it creates a lot of dust and scraps. Clean up afterward with a shop vacuum.

Next, brush flux on all joints to be soldered (flux helps solder flow freely and adhere) and on the tip of the hot soldering iron, then clean the tip on a wet sponge (you should see water when you press on it). Glass cutter cleaners—sponges in a hard plastic case—aren't very expensive, but you also can substitute an ordinary sponge in an appropriate container.
Place the solder near the joint and melt it with the iron. Don't use too much solder, and don't extend it past the joint. In a circular motion, move the iron across the joint, smoothing the solder into and across the joint. Don't leave the iron on the joint for more than two or three seconds, or you risk melting the came. You may get solder drips on the glass, but they should easily slide or scrape off or with light scraping.

Check the joint—if you're unhappy with the soldering, let it cool and then work on it again, bearing in mind that the came can melt. When you're done, wipe down the window with paper towels and glass cleaner, then turn the window over and repeat the soldering process.

Step 8: Cement the Window
The last step is cementing the panes in place with putty and whiting. Glazing putty has a shelf life—it should be moist with some oil showing on top. If your putty gets too hard, add a touch of linseed oil to soften it up, but don't overdo it—putty should be firm, not runny.
The last step is cementing the panes in place with putty and whiting. Glazing putty has a shelf life—it should be moist with some oil showing on top. If your putty gets too hard, add a touch of linseed oil to soften it up, but don't overdo it—putty should be firm, not runny.
Wearing latex gloves, take a ball-size portion of the putty and knead it for a minute or two. The putty will soften as you work it—some lumps are normal, but most smooth out. You can add a light sprinkling of whiting to the putty for strengthening, but we preferred the putty alone because too much whiting can dry out the putty.
Secure the panel with glazing nails, then take some putty and press it into the cames to fill spaces between the glass and the lead came. Don't put too much pressure on the window—you don't want to crack the glass. Some putty may leak through to the other side. Once you've completed the panel, clean around the seams with an awl or a fid, and remove excess putty with a little roll of the putty itself or a natural-bristle brush.
Secure the panel with glazing nails, then take some putty and press it into the cames to fill spaces between the glass and the lead came. Don't put too much pressure on the window—you don't want to crack the glass. Some putty may leak through to the other side. Once you've completed the panel, clean around the seams with an awl or a fid, and remove excess putty with a little roll of the putty itself or a natural-bristle brush.

Whether or not you used whiting during kneading, you'll need to sprinkle some over the window at this point. Wear a face mask and sprinkle the whiting gently; try not to create a cloud of whiting dust. Next, gently spread the whiting around by moving a natural-bristle brush in a circular motion along the cames. The linseed oil should start drying up, and the lead will start to oxidize (turn darker), which is your cue to vacuum up the whiting. If there is residual oil, repeat the process with a second coating of whiting.

Take your natural-bristle brush and sweep the lead to create a dark patina. Doing this by hand can be tedious and labor-intensive, but we liked the results. A faster method mounts a bristle brush attachment on a drill. It's a good idea to break the brush in on the edge of the worktable first so bristles polish the lead instead of scratching it.
With the patina ready, we returned the window back its door frame and reattached the trim, giving our 1906 china cabinet a new lease on life.
With the patina ready, we returned the window back its door frame and reattached the trim, giving our 1906 china cabinet a new lease on life.

Former OHJ staffer Lynn Elliott is a copy editor for Random House Children's Books and has written numerous articles on repairing and decorating old houses.
Tuesday, April 26, 2011
Constructing a leaded glass panel
The Process in Overview
In this method a lead channel is used to hold the pieces of glass together as opposed to strips of copper foil "tape" in the Tiffany or Copper Foil Method. The lead came used is a soft, flexible material that bends easily to the shape of the glass. When seen in cross-section, flat came resembles the letter H laid on its side: It has a vertical crossbar down its middle, with 2 channels on either side. This crossbar, or heart, is approximately 1/16" thick and serves to separate the pieces of glass that are fitted into the channels on either side. The came is cut where it meets another came at intersections in the design. These intersections, called joints, are then soldered, front and back. When viewed a leaded piece appears as shapes of colored glass silhouetted and outlined by the dark came. The process of creating a leaded panel is sometimes referred to as glazing.
Lead Came
Lead is a unique metal: It is extremely soft in its pure form, has little mechanical strength, almost no elasticity, and melts at relatively low temperatures. These properties were probably the reasons early stained glass craftsman selected this it. They could form it into usable strips, it was easily cut, and easy to shape and work with their hands.
Lead is a unique metal: It is extremely soft in its pure form, has little mechanical strength, almost no elasticity, and melts at relatively low temperatures. These properties were probably the reasons early stained glass craftsman selected this it. They could form it into usable strips, it was easily cut, and easy to shape and work with their hands.
Why is it called lead came? The Romans were key in introducing the use of lead throughout Europe and the Mediterranean. They produced lead "came" by laying reeds side by side in a shallow pit. Molten lead was then poured into the pit covering the reeds. Once the lead cooled, it was sliced into strips and the burnt reeds removed leaving a concave channels for the glass. It was called Calamus Plumbum, or Reed Lead. As Roman influence gave way to the Gaels in northern Britain, Calamus shortened to Caim. Later Caim was Anglicized to Came. This was how the channeled lead used in stained glass fabrication became Came Lead or lead came1.
 The lead cames used in stained glass are made by an extrusion process where the molten metal is pressed through a steel die, remember the Play-Doh Fun Factory?It can be pure lead or contain a small percentage of other metal alloys, antimony is one, to toughen or make it bright. You can also find in encased in a brass "skin" or made entirely of other metals such as copper, zinc and brass. Now it is even comes as lead free.
 Lead came: All cames come in 4 basic shapes: round H, round U, flat H, and flat U. There are also specialty cames such as high heart and those with unique profiles like colonial and prairie style. The size if a came refers to the width of the face, regardless of style. 1/4" Flat U and 1/4" round H both are 1/4" wide. The portion that connects the two faces is called the heart and standard width is 1/16" and 5/32" tall. The channel is the portion the glass slides into and it is most often 3/32" deep. Lead is most often purchased in either 6 foot lengths or coiled on spools. Generally H cames are interior leads and U cames are used on the perimeter.
Safety First!
Lead is a potentially hazardous material and certain precautions should be followed to ensure safe handling. Lead and lead oxides are not normally absorbed into the body through unbroken skin. They can enter by ingestion or through an open cut. Detailed information is available from your lead came supplier, in publications from the SGAA but you can start with:
Lead is a potentially hazardous material and certain precautions should be followed to ensure safe handling. Lead and lead oxides are not normally absorbed into the body through unbroken skin. They can enter by ingestion or through an open cut. Detailed information is available from your lead came supplier, in publications from the SGAA but you can start with:
- Always wash your hands thoroughly with soap and water after working with lead.
- Never eat, drink, or smoke while working on your lead came projects. Keep all food and drink out of your work area.
- Always protect open cuts or sores with a bandage.
- Never allow children access to your tools, lead supplies or your glazing work area.
- Pregnant and nursing women must avoid contact with lead products.
In the Tool BoxThere are a few tools you will need unique to leaded glass construction. These are in addition to your basic glass cutting tools.
- A work surface that you can nail into and attached two raised edges (glazing blocks) to.
- Glazing hammer: special hammer with both soft and hard heads.
Lead knife and / or lead nippers: for cutting the lead cames to length.
- Horseshoe or glazing blocks: for holding glass and came in place during construction and soldering.
- Lead pattern shears: These remove the correct amount of space from pattern pieces to account for the thickness the heart takes up.
- Fid: tool used to help fit, position, and seat the glass and lead during construction.

Preparation
Pattern Preparation: You will need to make 3 copies of your pattern. One for reference, one to cut apart with your lead pattern shears and one to assemble on. It is helpful to number and make any notations about color, grain direction on all three copies.
Pattern Preparation: You will need to make 3 copies of your pattern. One for reference, one to cut apart with your lead pattern shears and one to assemble on. It is helpful to number and make any notations about color, grain direction on all three copies.
Work Surface Preparation: Lead panels are built out and down from a staring corner to the opposite corner. First attach two glazing blocks (strips of wood) at right angles to each other onto your work surface. These will give you and edge to work against and help keep your panel square as it is constructed. Place the working copy of your pattern with the bottom and left hand side against these two guides and secure in place. You will build your project on top of the pattern. This way you can check your piece size and lead placement as you go.
Cutting your pieces: Use your lead pattern shears to cut apart pattern piece copy. Use these to layout, score and break out all the glass pieces for your project. Check your piece size and shape by laying the cut pieces onto the assembly pattern. You should be able to see the drawing lines around each piece. Grind or re-cut pieces as needed.
Stretching the LeadLead came needs to be stretched just prior to use. This is done to remove the initial creep that lead will undergo in time and to also stiffens it. (For a more detailed explanation please read the Stretching Leadarticle by G. Copeland). There are several different ways to stretch lead: Two people can hold opposite ends in pliers and pull; you can secure on end in a vice and use pliers to pull the opposite or there are lead pullers. What you are looking for is to pull the lead straight back making sure no to twist or kink it. Initially you will feel some resistance, then the lead will give way and then you will feel resistance again.
Cutting the LeadUsing lead nippers requires just a bit of practice. You will cut across the open channel, not across the face. Cutting down through the face can cause the faces of the came to become smashed and distorted. You want to position the jaws at 90° to the open end of the lead channel, making sure the face of the pliers remains square to the came as you squeeze the handles and cut the lead to length. You don't want to tip forward or away as you cut. This will leave gaps in your lead joints and prevent them from soldering together properly.
You should notice that the side of the came that faced the flat side of the pliers has a nice, straight edge. The opposite edge on the remaining piece will have a pointed edge. This is due to the shape of the nippers. You will need to take your nippers and remove that point so that you have a nice straight edge before cutting it to length for you next piece. You also need to pay attention when cutting your came pieces to length that you are cutting the clean edge on the piece being used for assembly. Practice on some scrap pieces first to get a feel for the nippers and how they work.
AssemblyStart by cutting two pieces of lead for the bottom and left side edges of the panel. Generally U lead is used around the perimeter if the piece is going into a framework of some type. If you plan to free hang it you may want to consider using zinc or another metal U came for added strength. Place these on top of the working drawing, against the stops. Now place that piece of glass that goes into the corner, inserting it into the channels of both sides. You should see the drawing line exposed around the glass piece. If you don't remove the piece and either groze or grind it until it does.
 Now take a piece of H came and measure and cut it to fit onto the exposed glass edge and butt neatly against the leading already in place. The place where two or more pieces of leading meet is the lead joint. Secure in place with a push pin or cushioned horseshoe nail. You will soon be able to gauge how much shorter to cut your lead piece to accommodate the channel overlap of the adjoining lead pieces. There may be places due to the design where the leads don't' meet at a nice right-angles and the leads need to be cut on an angle or miter to fit properly.
You continue building over and up in this manner, inserting the class pieces and fitting and cutting the lead came that surrounds them. This is where a fid and glazing hammer may be useful when helping fit and coax pieces into place. As you move along in the construction, make sure that your pieces are fitting within the lines of the design and you're sufficiently securing the pieces as you work to prevent shifting.
When all the glass pieces and interior leading are completed, use more of the perimeter came to finish the remaining edges and secure the entire panel in place.
Soldering Lead projects are soldered at the places where lead cames meet, the joints. This is different from copper foil where all the seams are soldered together. The soldering tools needed are the same: a chisel tip soldering iron for stained glass, a stained glass solder, flux, and a well ventilated area to solder in. You may find a iron and rheostat combination easier to work. It allows you to control the tip temperature so that you melt the solder and not the lead came. It is a good idea to tip test your iron before soldering. Hold the iron tip against a scrap of lead. You should be hold the iron there for a few seconds without melting the lead came itself. This is where an iron and rheostat combination is handy in helping you dial in the exact right temperature.
Lead projects are soldered at the places where lead cames meet, the joints. This is different from copper foil where all the seams are soldered together. The soldering tools needed are the same: a chisel tip soldering iron for stained glass, a stained glass solder, flux, and a well ventilated area to solder in. You may find a iron and rheostat combination easier to work. It allows you to control the tip temperature so that you melt the solder and not the lead came. It is a good idea to tip test your iron before soldering. Hold the iron tip against a scrap of lead. You should be hold the iron there for a few seconds without melting the lead came itself. This is where an iron and rheostat combination is handy in helping you dial in the exact right temperature. Apply flux to all the lead joints. The goal is to apply flux only to the you want the solder to stick to. A rule of thumb is that the solder extends out from the center of the joint an amount equal to the width of the came face. Place the end of the solder on the joint and touch it with the flat side of the iron tip and allow the solder to melt down onto the joint. At that point move the tip in a small circular motion for just a second then pull (not lift!) the tip away. The solder should flow into a gently rounded bead, extending evenly onto all the cames from the joint center. If the solder is not smooth, place your iron back on the soldered joint and move in a circular motion until it is molten then pull away. You may need to apply a bit of additional flux.
You will solder all the joints on the front of the panel then turn it over and repeat the process on the back. Inspect both sides to make sure you haven't missed any and you have nice, smoothly soldered joints. Clean and then you are ready for cementing, the final step.
Occasionally you may find a your leads don't exactly meet edge to edge and there is a gap. These gaps won't take solder and can prevent proper joining or result in a pinched solder joint. Beginners especially find this when the flip the panel over to solder the back. There is a way to bridge that gap called chinking. Chinking involves taking a small piece of came and cutting it half long-ways, down the center of the heart. You then cut small pieces from one of the halves that will fit into that gap snugly. Flux and solder as outlined above. You can find more information on soldering both lead came and copper foil products online in Inland Crafts' free How to Solder Like a Pro booklet.
CementingThis is the final step in assembly of a leaded glass panel. It helps secure the glass in the came, strengthen, and weatherproofs the piece. Even if you are hanging the piece indoors you need to cement for the added strength it adds to the piece. The process forces the cementing material into the spaces in the channel between the glass and came.
 You will need a cementing product specifically for leaded glass, whiting (or sawdust), two natural bristle brushes and several layers of newspaper to cover your work area. Follow the manufacturers directions for mixing the cement. Pour some cement onto the panel or pick some up on the end of one of the brushes. You want to push the cement up against the lead, forcing the cement under leaves and into the channels, making sure to work against all the faces.
 Once you have worked in the cement, sprinkle the entire panel lightly with whiting. Whiting helps soak up the oils, dry the cement and clean up any excess. Use the second brush to scrub the entire panel surface. Work first in a circular motion, then parallel to the lead came until all excess cement is removed. The whiting will also help burnish and darken the lead while polishing and brightening the glass. The longer you work the whiting, the darker the lead becomes.
 Once the front is cemented and cleaned, turn the panel over onto a clean layer of newspapers and repeat the process on the back side. Leave your panel to lay flat for 24 to 48 hours to allow the cement to set and start curing. Wile drying, you may notice places where the cement has oozed out. Use a pointed wood stick (sharpened dowel, craft stick cut at an angle, fid) to scrape along leads and perimeter of each glass piece to remove. You can find more detailed information on cementing a leaded glass panel online in Inland Crafts' free Cementing "How To" booklet.
Thank you to our friends at Inland for writing this tutorial. http://www.inlandcraft.com/
Subscribe to:
Posts (Atom)
Subscribe To The Blog


 Posts
All Comments
Posts
All Comments





